Introduction
This tutorial illustrates the fundamental features of capturing a Marriage Record using Ancestral SourcesAncestral Sources is a utility written by Nick Walker, designed to be used in conjunction with Family Historian to allow faster, more convenient creation of Census, Birth, Baptism, Marriage, Death and Burial/Cremation records. and adding its details to your Family Historian database. It is based on very old versions of Ancestral Sources and Family Historian, so does not include some of the features that are now available such as templated sourcesFamily Historian Version 7 introduced the ability to define sources using 'Source Templates' to aid precision and consistency in entering source-identifying information. and rich-text. Videos that refer to those new features are available on the Ancestral Sources Videos page. However, the fundamental concepts of capturing the data are still reasonably relevant.
Throughout the tutorial the notation ‘Option1 > Option2 > Option3 button’ means select menubar Option1, then Option2, and finally click the Option3 button.
It is feasible to copy & paste many of the data values from the tutorial scripts directly into Ancestral Sources input forms.
Before you proceed with the rest of this tutorial, please Configure Initial Settings.
1. Enter Marriage Information
It is assumed that you have obtained a Marriage Certificate as part of your family history research, and want to enter its details into Family Historian by using Ancestral Sources.
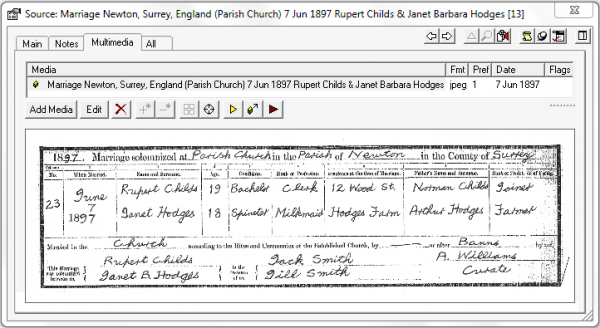
A transcript of a Marriage Certificate (which is entirely fictitious) is shown below.
1897 Marriage at Parish Church in Newton in the County of Surrey
No.23 June 7th 1897
Rupert Childs age 19, Bachelor, Clerk, 12 Wood Street, father Norman Childs, Joiner
Janet Hodges age 18, Spinster, Milkmaid, Hodges Farm, father Arthur Hodges, Farmer
Married in the Church after Banns by A. Williams, Curate
Marriage between Rupert Childs & Janet B Hodges in the presence of Jack Smith & Jill Smith
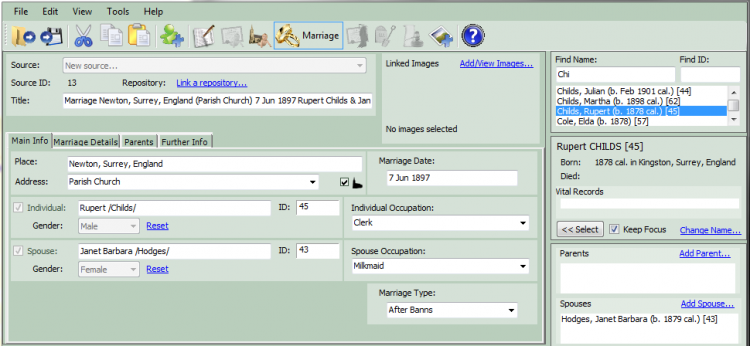
Marriage Data Entry Screen
- The marriage data entry starts here, and this first section completes the Main Info tab in the centre of the window.
- The rest of this tutorial, up until the data is saved to file, must be completed in one session, otherwise all the data will need to be re-entered.
- Open Ancestral Sources and ensure the Family Historian Sample Project or the Sample.ged file opens by default, but if not then Configure Initial Settings.
- Notice that the members of the sample Munro family tree are listed in the top right-hand panel.
- Ensure that the Marriage Records mode is active by clicking the Create marriage entries button near the middle of the toolbar, or by choosing View > Marriage Editor.
Main Information
- Ensure that the Main Info tab is selected.
- The Church Parish from the transcript should be entered into the Place field, and the Church Address into the Address field (e.g. PlaceAccording to GEDCOM, a Place should hold "The jurisdictional name of the place where the event took place…" : Newton, Surrey, England and Address"The address structure should be formed as it would appear on a mailing label…", according to GEDCOM; however, this is capable of a number of interpretations, and Address and Place are best considered together.: Parish Church).
- These will become the Place and Address values used in the Marriage Event and other Facts created by Ancestral Sources.
- If there are matching Place or Address values in your GEDCOMGEDCOM, an acronym for GEnealogical Data COMmunication, is a specification for exchanging genealogical data between different genealogy software. It is a file format that most genealogical programs and online trees recognise. data, then these fields will auto-complete, and Address values will be available from a drop-down list, depending on the check box to the right.
- From the transcript, enter the Marriage Date as 7 June 1897.
- To choose the groom in the marriage transcript, enter the start of his surname (Chi) into the Find Name box above the family names, and select Rupert from the list. Notice that his bride is listed under Spouse below, because earlier research has shown they were a couple.
- To add Rupert as the groom, click the << Select button, or use Edit > Add current individual to the entry, and select Individual from the popup list.
- In the Choose Family window that appears, select Janet Barbara HODGES as the spouse and click OK.
- Alternatively, you would choose A previously unrecorded spouse, and then either select her from the list of existing names, or use the Add Spouse… link on the right to create a new Individual.
- As the Place, Address, Marriage DateWhen an Event happened, or an Attrribute was true., Individual, and Spouse fields are entered, they also appear in the Title above.
- It is beyond the scope of this tutorial, but the Title field can be customised by a template that compiles data from a variety of sources.
- See the menubar Tools > Options > Marriage settings – method 1 > Marriage Method 1 Title Template option and the Title & Type Templates tutorial for details.
- If you have a source naming convention, try and replicate it using this template, to ensure consistent titles.
- From the transcript, enter the Individual Occupation of the groom as Clerk. Ancestral Sources may offer this in a dropdown list from existing factsFacts are one of the key concepts at the heart of Family Historian; they are how you record the things that happened to, or described, each ancestor (Individual).. Then enter the Spouse Occupation of the bride as Milkmaid.
- Lastly, select the Marriage Type of After Banns from the dropdown list.
2. Enter Marriage Details
The marriage transcript gives further details of the bride and groom that can be entered.
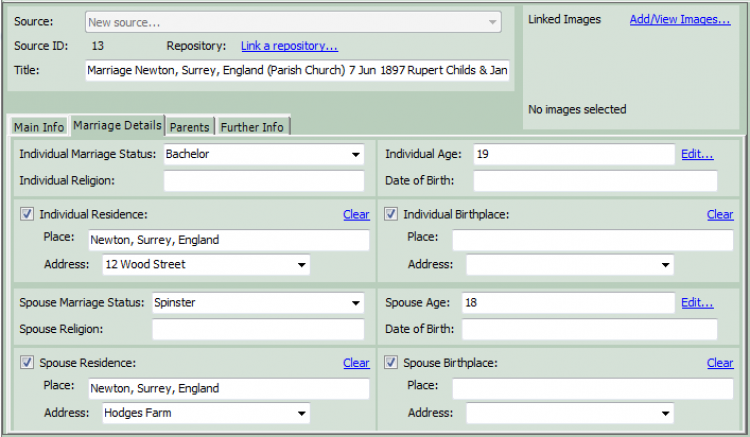
Marriage Details
- Ensure that the Marriage Details tab is selected.
- Select the Individual Marriage Status of Bachelor for the groom, enter his Individual Age as 19, and his Individual Residence as the Place of Newton, Surrey, England with Address of 12 Wood Street.
- Select the Spouse Marriage Status of Spinster for the bride, enter her Spouse Age as 18, and her Spouse Residence as the Place of Newton, Surrey, England with Address of Hodges Farm chosen from the dropdown list.
- Sometimes, further details on a transcript might allow other fields on this tab to be completed.
3. Enter Parent Details
The marriage transcript gives details of the father of both the bride and groom.
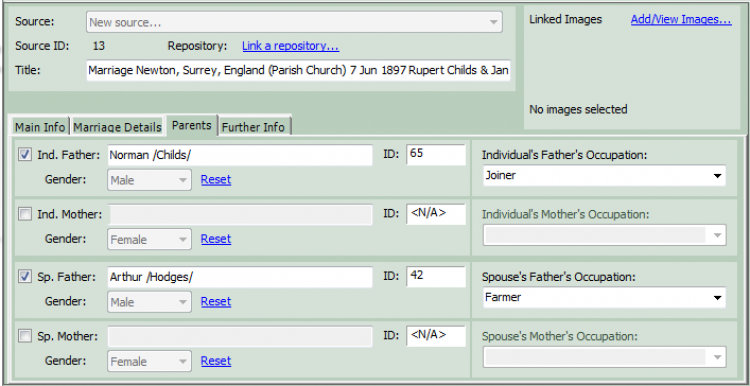
Parent Details
- Ensure that the Parents tab is selected.
- Ensure that Ind. Father is ticked, and that Childs, Rupert is selected in the panel on the right, then use the Add Parent… link on the right to enter the groom’s father’s Name as Norman Childs with Gender of Male.
- Enter the Individual’s Father’s Occupation as Joiner.
- The bride’s father was already known, so Ancestral Sources has completed the entry.
- Enter the Spouse’s Father’s Occupation as Farmer.
- The ticked entries will be included in the Auto Text as a transcript of the marriage record.
- Sometimes the mother of the bride or groom may also be found on marriage records.
4. Enter Further Information
The marriage transcript gives A. Williams as the minister and Jack & Jill Smith as the marriage witnessesA Witness is somebody who played an important role in an event (or rarely, attribute) but were not a Principal, e.g. they could have been a bridesmaid at a wedding, rather than one of the individuals getting married..
For this example the witnesses are assumed to be unrelated to the family and will NOT be added to the database as Individuals.
Further Information
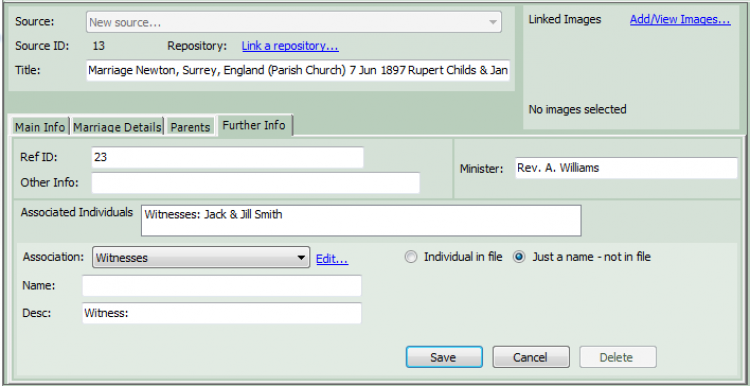
- Ensure that the Further Info tab is selected.
- Enter the Ref ID as 23 from the transcript, or enter the GRO Index for the marriage if known.
- There is no Other Info to enter.
- Enter the Minister name as Rev. A. Williams from the transcript.
- Under Associated Individuals ensure that the Association is Witnesses.
- Select the Just a name – not in file option, enter the Name as Jack & Jill Smith, and make the Desc plural Witnesses:
- Click the Save button to register the details.
- It is beyond the scope of this tutorial, but Associated Individuals can be customised by a template to allow associated persons to be recorded in various ways. See the Edit… link option in this pane and the Associated Individual Types editor tutorial for details.
5. Edit Auto Text and Note
The next two areas below the tabs are the Text and Note boxes, which define multi-line text for the Text From Source and Note fields of the Source Record.
Auto Text Transcript
- To create an automatic transcript of the Marriage, click the Auto button, or use Edit > Auto Text, and select the Marriage Certificate 1837- (England/Wales) option.
- Note how all the data entered so far is reproduced automatically, and that other options are available to produce different transcript layouts.
- The ticked Auto option allows any further changes made to the data to be automatically updated in the Text box, unless the text has been manually edited.
- To edit the text, click the Text link to obtain a large editing window. On the 3rd line enter the County of Surrey, make any other desired changes, and click OK when satisfied that the transcript accurately reflects the Marriage record.
![]()
- It is beyond the scope of this tutorial, but the Auto Text transcript can be customised with a template that compiles data from many fields to generate an alternative transcript. See the menubar Tools > Autotext Template Editor options and the Auto Text Templates tutorial for details.
Source Note
The Note box can be similarly edited via the Note link, and possibly should say Fictitious tutorial data.
Source CitationA link between a source and a fact, documenting Where within the source you find information being "cited" to support the fact/conclusion.
- To set citation options, use Tools > Options… > Marriage settings.
- Under Sources in the centre, tick both the Citation Certainty and the Use Citation Entry Date options, and then click OK.
6. Add Multimedia Image
- For UK marriages from 1837 onwards, a GRO Marriage Certificate should be available, and its scanned image linked to a Multimedia Record associated with the new data entered via Ancestral Sources.
- Alternatively, you could work from Church Parish Marriage Records that register similar details.
- A Marriage Certificate image is provided for this tutorial, so right-click the image below, select Save Image As… and Save the file to your usual family history working folder.
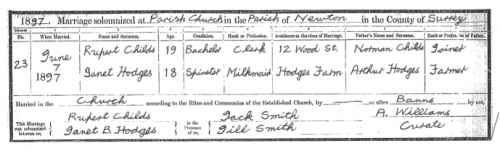
Image Viewer
- To open the Image Viewer, either use Edit > Add/View Images… or click the Add/View Images… link in the Linked Images panel.
- Ensure the Link new image option is selected, then click the Select File… button, and Open the image file that was downloaded above. This image file should appear in the image panel on the left.
- There are several options for specifying the Image Title and the Linked Filename of the Multimedia Record.
- One option, beyond the scope of this tutorial, allows the Image Title to be customised by a template that compiles data from a variety of sources. See the menubar Tools > Options > CensusCensus records are national collections of population statistics. They usually record details about members of a household on a particular date, and are typically collected every ten years. settings > Census Image Title Template option and the Title & Type Templates tutorial for details.
- For this tutorial select Same as source title and tick Rename file to match title, which neatly assigns the same Title to the Multimedia Record and Image Filename as the Source Record.
- In the Keywords box select Document as well as Picture.
- Now click the Save button at the bottom.
- If using Family Historian Version 4.1 (or later) there may be a prompt to choose the Media folder into which to eventually copy the image file. Click the Yes button, and in the popup click New Folder, create a Marriage folder, and click OK. However, if you placed the image file directly into the Media folder or sub-folder, then this prompt is bypassed.

Close the Image Viewer window by clicking its Close button.
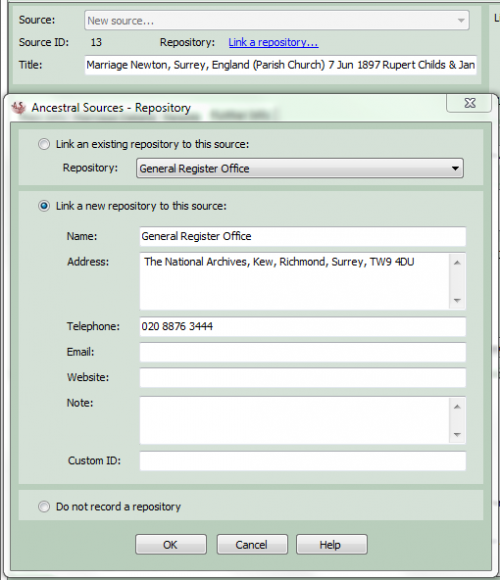
7. Create Repository Link
In the same way that a Source cites the derivation of one or more Facts, a Repository cites the owner of one or more original Source documents.
Repository Link
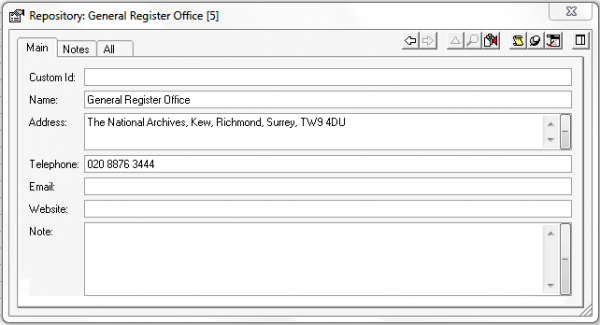
Marriage CertificatesMarriage Certificates are a civil record of the marriage of spouses, and typically include the date and place of marriage together with information about parents, witnesses and ministers or registrars involved in the service. for England and Wales are lodged with the General Register Office.
- To cite this as the Repository, use the Link a repository… option.
- In the Repository window select Link an existing repository to this source, and from the Repository dropdown list select General Register Office if it is available.
- Otherwise, select Link a new repository to this source. Enter the Name as General Register Office, the Address as General Register Office, PO Box 2, Southport, PR8 2JD and the Telephone as 0300 123 1837.
- Click OK to close the window.
Alternatively, the Repository could cite an online genealogy website, such as Ancestry UK or Find My Past, from where the marriage records were obtained.
Other records obtained from the same place would simply link this existing Repository to the Source.
8. Save to Family Historian
This is the final step, so before committing the data to be saved, just check it over carefully. After the data has been saved, it can be examined in Family Historian, and modified if necessary.
Save Entry to File
- When satisfied with the data you’ve entered, click the Save File button near the left of the toolbar, or use File > Save Entry To File.
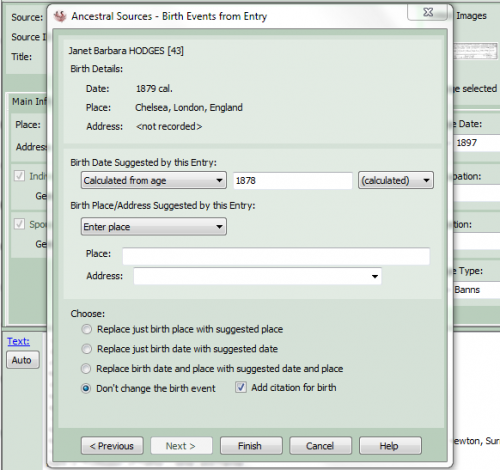
- If the Choose Family window appears then select Existing family consisting of these two individuals and click OK.
- For any key person’s Birth Event, where Date or Place details are suggested by this Marriage, a popup Birth Events from Entry window offers options to accept or reject the suggestions.
- Various Birth Event options can be selected by using Tools > Options… > General settings and Marriage settings.
- The two spouses may already have a Birth Event recorded. In which case choose Don’t change the birth event but tick the Add citation for birth option.
- Otherwise, if no Birth Event is recorded, choose Create birth event with suggested date.
- After Rupert’s choice click the Next > button, and after Janet’s click the Finish button.
- Then, and only then, will Ancestral Sources commit the data entry to the GEDCOM database.
- A Retain Data window will appear to allow values to be retained for another marriage entry, but as there is only one, click Cancel.
- If you use Tools > View Log Files… it shows a comprehensive list of all the changes made.
- Finally, close Ancestral Sources by using the File > Exit option.
9. Examine Family Historian
Now let us examine the Family Historian data to see how much information Ancestral Sources has automatically added.
Family Historian Data
Run Family Historian and open the Family Historian Sample ProjectA Project is a Windows folder, created by Family Historian, which contains all your Family Tree information recorded in Family Historian. Normally located in the Documents\Family Historian Projects folder..
Locate the groom Rupert CHILDS and open his Property BoxThe Property Box is the primary window for data entry and for viewing details of stored records. It is used with records of all types. , and ensure Show Sources is enabled.
Individual Details
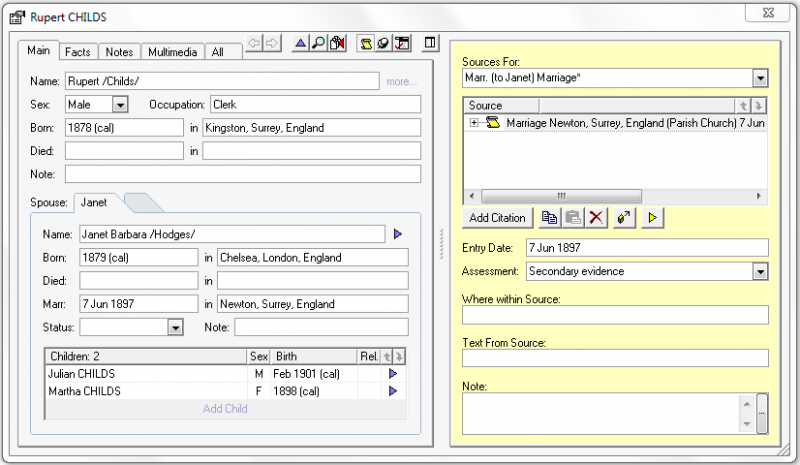
- Click on a Born or Marr field to see the Marriage Source citation, with its Entry Date and Assessment completed.
Alternative values for these fields can be chosen via Tools > Options… > Marriage settings within Ancestral Sources. - Select the Facts (or Events) tab for Rupert CHILDS, his spouse Janet HODGES, and their fathers Norman CHILDS, and John HODGES in turn. Note the Marriage event and Residence and Occupation attributesEvents are things that happened to an Individual and Attributes are things that described them. created by Ancestral Sources, including the Date, Age, Place and Address details.
- For example, the Marriage event for Rupert and Janet shows the Date, their Age, and Place & Address of the marriage, and the Note identifies the Witnesses.
- Since Family Historian Version 6, the Facts tab and Sources For pane have a Show Media button in their central toolbars, offering a shortcut to any associated Media images.

- The OccupationAn occupation is defined in the GEDCOM standard as: ‘The kind of activity that an individual does for a job, profession, or principal activity’. attribute of Janet HODGES assumes she worked in the same Place as her Residence, but not at the same Address.
- However, such assumptions can be changed via Tools > Options… > Marriage settings within Ancestral Sources.
- In this instance Janet probably did work at her residence Hodges Farm, since she was a Milkmaid, and this detail can be changed in Family Historian.
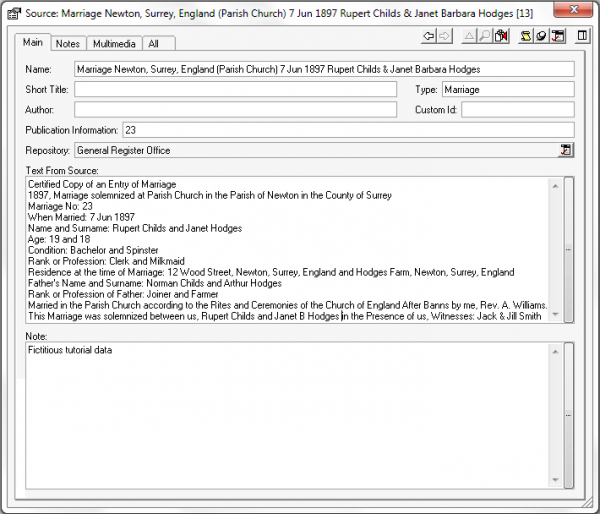
Source Record
Open the one Source Marriage Record that is cited by all those Facts, and notice how all the new data is presented.
- If for example, anyone ever asks how you know that Rupert and Janet were Married in June 1897, you can easily find the Source of that information.
- Note that the Title, Type, Publication Information, Repository, Note, and Text From SourceBoth Source records and Citations have a Text From Source field intended to hold transcripts of source documents. marriage transcript, were all automatically inserted by Ancestral Sources.
- Click on the Repository icon to the right, and select Go to Repository record to review the GRO Repository contact details of the owner of the original source document.
- Go Back to the Source Record and select the Multimedia (or Objects) tab to see the linked Marriage Image file with its Date set to the Marriage date.
- Click the Edit button to reveal the Keywords set to Document, Picture.
Summary
- A Marriage record that took just a few minutes to enter in Ancestral Sources has created many new Facts and a new Individual, all citing a new Source, which is linked to a Repository record.
- It could have all been done in Family Historian without Ancestral Sources, but it would probably have taken at least three times as long, using a tedious and repetitive set of steps.
This is the end of the marriage tutorial. Please select another tutorial or Restore Original Settings.