Introduction
Facts are one of the key concepts at the heart of Family Historian; they are how you record the things that happened to, or described, each ancestor (Individual).
Understanding how to work with Facts within ƒh is fundamental to recording your Family History effectively. If you’re new to ƒh and/or Genealogy, you may wish to work through our Getting Starting guide first. And you should also review the ƒh Help file sections on Property Box: Facts Tab and Facts (Events and Attributes). And then take time to read this article end to end, to get a good foundation on working with facts.
There are various types of Facts: Individual, Family, Timeline, and Witness FactsWitness Facts allow multiple Individual records or just Names to be linked to one Fact and have & icons in the Property Box Facts tab.. We’ll start by discussing some general matters, move on to the simplest Fact types (Family and Individual) which exist in all versions of ƒh, and then move on to Timeline Facts, which were introduced in Version 6. Witness Facts (also introduced in Version 6) are covered in another article.
Where Do You Work with Facts?
When you’re working with facts, you’ll be working in the Property BoxThe Property Box is the primary window for data entry and for viewing details of stored records. It is used with records of all types. for an Individual.
To get there:
-
- Select an Individual (in the Focus WindowThe Focus Window is the primary workspace window. It displays information about a chosen person, called the 'Focus Person'., in the Records WindowThe Records Window provides a comprehensive view of all the information stored within a Family Historian project. or in a Diagram Window).
- Right-click and choose Properties
 .
.
You can configure ƒh to also open the Property Box when you double-click on a selected Individual: Go to Tools > Preferences… and check what the settings are for Double Click Action for the Focus Window , and also Double Click on record in Record List for the Records Window.
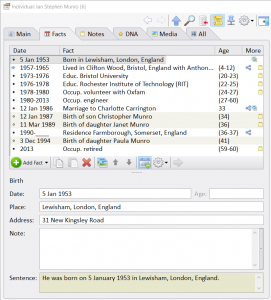
Facts are entered and edited either on the Main Tab or the Facts Tab.
We recommend using the Facts Tab; there are more and better facilities than on the Main Tab.There are important details you cannot add on the Main Tab, and you cannot see all a Individual’s Facts in relationship to each other.
The Main Tab does allow you to quickly and simply view and record Birth, Death, Marriage, with datesWhen an Event happened, or an Attrribute was true. and placesAccording to GEDCOM, a Place should hold "The jurisdictional name of the place where the event took place…" ; it can also be customised to show other Facts.
What are Events and Attributes?
“Facts” is a shorthand for two things called Events and Attributes.
Broadly speaking, Events are things that happened to an Individual, such as:
- Birth
- Marriage
- Death
- Burial
- (Was enumerated in a) CensusCensus records are national collections of population statistics. They usually record details about members of a household on a particular date, and are typically collected every ten years.
and Attributes are things that described them, such as:
- Physical Description
- OccupationAn occupation is defined in the GEDCOM standard as: ‘The kind of activity that an individual does for a job, profession, or principal activity’.
- ReligionThe GEDCOM specification says that the Religion attribute should be used for the religious denomination to which a person is affiliated or for which a record applies.
In most respects, there are no differences between working with Events and working with Attributes; where there are, this article will point them out.
Individual and Family Facts
What Makes Up an Individual or Family Fact?
A Fact has the following basic components. Some of these (the Detail Fields) you’ll define when you add a Fact; others are pre-defined but it is still useful for you to know about them at this stage. (There are more elements than these, but these are the essentials.)
| Fact Name | This identifies the fact e.g. Birth, Death, Adoption, Occupation — you’ll use this when you’re adding a Fact. |
| Fact Type | Event or Attribute |
| Record Type | Individual or Family
Some Facts apply to both parents in a Family (e.g. Marriage or Divorce) so using a Family Fact allows you to enter the details only once. Most Facts, however, are Individual Facts and apply to a single individual. (Witness Facts are a bit different, but we’ll set those aside for now). Note: Do not make the mistake of thinking that a Family Fact applies to all family members; it only applies to the parents. (This means that we do not recommend using the Family Census event as it saves very little data entry and creates complications in other functionality). In the Facts tab, blue bullets are used for Individual Facts and red bullets for Family Facts. |
| Fact SetA Fact Set is a defined list of types of Facts - that is types of Events and Attributes. | A Fact Set is a collection of Facts, typically grouped according to how they became available to you:
|
| Detail Fields | Date: the date (or date range) on which or during which an event happened or an attribute applied. See Entering Dates for details on how to do this.
Age: the age of the Individual at the relevant date. See Entering Ages for details on how to do this. Place and Address"The address structure should be formed as it would appear on a mailing label…", according to GEDCOM; however, this is capable of a number of interpretations, and Address and Place are best considered together.: Where a Fact took place. See Working with Places and Addresses for New Users. Not all Facts have a place associated with them; for example Physical Appearance isn’t something that applied at a single location. Value: The Value field only applies to Attributes, and contains e.g. Sous Chef for Occupation, or Red Haired for Physical Appearance. A notable exception is the Residence Attribute that does not have a Value, because the Place and Address fields specify the necessary detail. Note: All Facts can have a Fact Note, which you can use as you choose. |
Adding a Fact
On the Facts Tab, use the Add Fact ![]() button to see a menu (the Fast-Add Menu) where you can quickly select one of the most commonly-used Facts, or choose More Fact Types… to open the Fact Types window and select from all available Facts. (The Fact Types menu allows you to manage how individual Facts are defined and behave, but it isn’t essential to make any changes.)
button to see a menu (the Fast-Add Menu) where you can quickly select one of the most commonly-used Facts, or choose More Fact Types… to open the Fact Types window and select from all available Facts. (The Fact Types menu allows you to manage how individual Facts are defined and behave, but it isn’t essential to make any changes.)
Add the Fact you Need and fill in the Detail Fields. Note: As you select or hover over one of the Detail Fields, an Entry Assistant ![]() button will become visible. You can type directly into a field, or use the Entry Assistant button to guide you.
button will become visible. You can type directly into a field, or use the Entry Assistant button to guide you.
Genealogy without Sources is Mythology.
If you go looking, you’ll find this quote all over the ‘Net. What it means in practice is that, if you don’t record (‘cite’) the source from which you derived the information that you use to create a Fact, you’re building your Family History on sand.
For every Fact you record, you should cite the Sources that led you to record that Fact. Ideally, you will always create a Source RecordSource: "where information was found". This could be anything from an archive in a county records office, a book, or even a relative's recorded recollection. Citing your Sources helps to show how you reached a particular conclusion about an Individual. first, and then create or update facts using the information in that Source(source-driven data entrySource-Driven Data Entry is a workflow that starts when you acquire a source, moves on to entering the details of that source and then on to creating the facts about people that you glean from the source (often automatically creating).
It might seem like an irrelevant nicety, but if you do not cite your Sources, you will find yourself wondering in future why you believed something to be true, especially if you find something that contradicts what you previously believed and need to double check. And, if you share your research, citing your Sources allows others to follow what you did and make their own mind up about whether you reached the right conclusion. You will be wrong, sometimes spectacularly. And if you are, you may want other people to point it out!
Sources and citing them is a big subject so we have another article on Working with Sources for New Users.
Editing a Fact
You edit a fact in the Facts Tab of the Property Window. Navigate to the relevant Fact and edit the Detail Fields. Remember to cite your new Source(s).
Deleting a Fact
You delete a fact in the Facts Tab of the Property Window. Navigate to the relevant Fact and either hit the X ![]() button or use the DEL key on your keyboard. You will get a prompt to check that you really intend to delete the Fact.
button or use the DEL key on your keyboard. You will get a prompt to check that you really intend to delete the Fact.
If you go ahead and then change your mind quickly, Edit > Undo will undo the deletion (but not after you’ve exited the programme)
Be aware: Deleting a Fact will not delete the Sources you cited in support of it — it just deletes the link; you might have cited the same Source in support of other Facts.
Timeline Facts (V6 and later)
Timeline Facts are Facts that you have already entered for close relatives of an Individual. You can optionally include these in an Individual’s list of facts (on the FactsTab), distinguished from other Facts by a light grey background, to give a complete view of the important events that happened in a person’s life.
To toggle the display of Timeline Facts, click on the Show Timeline Facts button ![]() on the Facts Tab Toolbar (below the list of Facts).
on the Facts Tab Toolbar (below the list of Facts).

To configure what Timeline Facts are displayed, click on the Menu button ![]() on the Facts Tab Toolbar and select Timeline Facts…
on the Facts Tab Toolbar and select Timeline Facts…
You can choose which Event Types and which Relatives to include in the display.
Be aware: if you click on a Timeline FactTimeline Facts are events for close relatives and have a grey bullet and shaded text in the Property Box Facts tab. you will start viewing the Facts for the relative concerned! The Back Button ![]() at the top of the Facts Tab takes you back to the original individual.
at the top of the Facts Tab takes you back to the original individual.
Some Simple Customisations
There are some simple things you can do to make it easier to work with Facts in a way that suits you, including:
- Showing additional Facts on the Main Tab of the Property Box.
- Adding or removing a fact from the Fast-Add Menu.
- Hiding Facts in the Fact Types window.
- Importing a custom Fact Set, and removing it if you decided not to use it.
See Some Simple Customisations for Working with Facts.