Introduction
This tutorial illustrates the fundamental features of capturing a Census Record and adding its details to your Family Historian database. It is based on very old versions of Ancestral SourcesAncestral Sources is a utility written by Nick Walker, designed to be used in conjunction with Family Historian to allow faster, more convenient creation of Census, Birth, Baptism, Marriage, Death and Burial/Cremation records. and Family Historian, so does not include some of the features that are now available such as templated sourcesFamily Historian Version 7 introduced the ability to define sources using 'Source Templates' to aid precision and consistency in entering source-identifying information. and rich-text. Videos that refer to those new features are available on the Ancestral Sources Videos page. However, the fundamental concepts of capturing the data are still reasonably relevant
There is a series of videos on How to Add a Census Entry showing the key features of the tutorials.
Throughout the tutorial the notation ‘Option1 > Option2 > Option3 button’ means select menubar Option1, then Option2, and finally click the Option3 button.
It is feasible to copy & paste many of the data values from the tutorial scripts directly into Ancestral Sources input forms.
Before you proceed with the rest of this tutorial, please Configure Initial Settings.
For each tutorial there is a corresponding video tutorial.
1. Enter Census Information
It is assumed that you have found a new Census Record as part of your family history research, and want to enter its details into Family Historian by using Ancestral Sources.
A transcript of this UK 1901 Census Return (which is entirely fictitious) is shown below.
| UK 1901 Census Record Transcript ▾ | |||||||
|---|---|---|---|---|---|---|---|
| RG Number: RG13 | Piece: 603 | Folio: 52 | Page: 10 | Schedule: 79 | |||
| Registration District | Guildford, Surrey, England | ||||||
| Address"The address structure should be formed as it would appear on a mailing label…", according to GEDCOM; however, this is capable of a number of interpretations, and Address and Place are best considered together. | 28, Park Road, Stoke Within, Guildford | ||||||
| Name | Relation | Condition | Sex | Age | Born | OccupationAn occupation is defined in the GEDCOM standard as: ‘The kind of activity that an individual does for a job, profession, or principal activity’. | Where Born |
| CHILDS, Rupert | Head | Married | M | 22 | 1878 | Clerk | Kingston, Surrey |
| CHILDS, Janet | Wife | Married | F | 21 | 1879 | Chelsea, London | |
| CHILDS, Martha | Daughter | Single | F | 2 | 1898 | Guildford, Surrey | |
| CHILDS, Julian | Son | Single | M | 1m | 1901 | Guildford, Surrey | |
Census Data Entry Screen
The census data entry starts here, and this first section completes the Census Information nearest the top of the main screen.
The rest of this tutorial, up until the data is saved to file, must be completed in one session, otherwise all the data will need to be re-entered.
Open Ancestral Sources and ensure the Family Historian Sample Project or the Sample.ged file opens by default, but if not then Configure Initial Settings.
Notice that the members of the sample Munro family tree are listed in the top right-hand panel.
Ensure that the Census Records mode is active by clicking the Create census entries button near the middle of the toolbar, or by choosing View > Census Editor.
Census Information
Towards the top right of the screen, ensure that Census Country is set to UK and Census Year is set to 1901.
Notice that as you make this selection, the Census Date is completed, and the Year and RG Number are added to the Title and Ref ID on the left.
This Title field will become the new Source Record Title, and the allotted Source ID is shown just above.
Continue by entering the rest of the Ref ID derived from the Piece, Folio, Page, and Schedule numbers in the transcript (e.g. Ref ID: RG13 0603 052 10 079) and notice that the Title follows suit. It is suggested that you add leading zeros to these numbers to make them 4 digits, 3 digits, 2 digits, and 3 digits respectively, because the Source Records will then sort into a more logical order.
The transcript Registration District should be entered into the Place field, and the transcript Address into the Address field (e.g. Place: Guildford, Surrey, England and Address: 28, Park Road, Stoke Within, Guildford).
These will become the Place and Address values used in the Census Events and other Events created by Ancestral Sources.
If there are matching Place or Address values in your GEDCOMGEDCOM, an acronym for GEnealogical Data COMmunication, is a specification for exchanging genealogical data between different genealogy software. It is a file format that most genealogical programs and online trees recognise. data, then these fields will auto-complete and the Address values will be available from a drop-down list.
As the Place is entered, it is also added into the Title.
It is popular to include the Head of the family in the Title and this can be achieved by entering his name in the Other Info field (e.g. Other Info: CHILDS, Rupert).

It is beyond the scope of this tutorial, but the Title field can be customised by a template that compiles data from a variety of sources.
See the menubar Tools > Options > Census settings > Census Method 1 Title Template option and the Title & Type Templates tutorial for details.
2. Add Multimedia Image
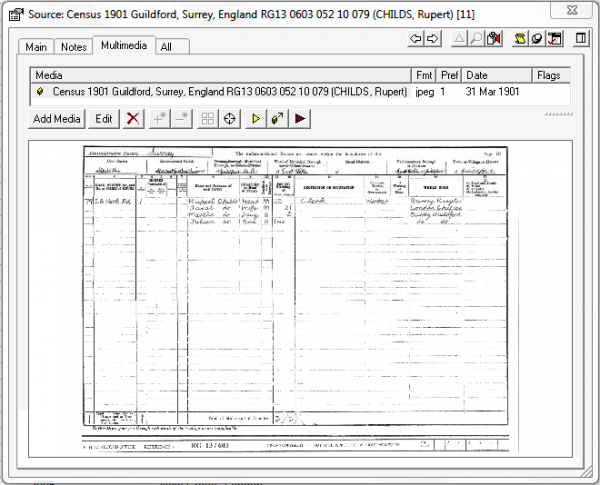
Typically a census transcript is accompanied by an image of the original census form, which is linked to a Multimedia Record and associated with the new data entered via Ancestral Sources.
Such an image is provided for this tutorial, so right-click the image below, select Save Image As… and Save the file to your usual family history working folder.
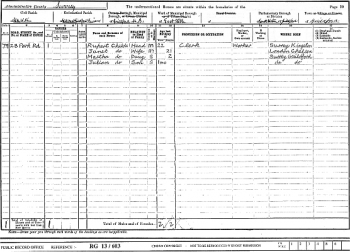
Image Viewer
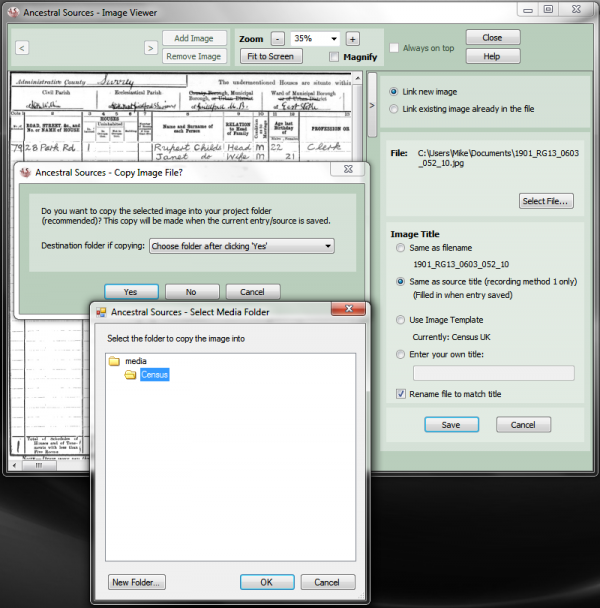
To open the Image Viewer, either use Edit > Add/View Images… or click the Add/View Images link in the Linked Images panel.
Ensure Link new image is selected, then click the Select File… button, and Open the image file 1901_RG13_0603_052_10.jpg downloaded above. This image file should appear in the image panel on the left.
Sometimes the Census Return spans two Folio Pages, in which case both image files should be linked so the whole family is included.
You can add any type of file, not just image files. In the Open file window, near the lower right corner, it lists Image Files (*.bmp;*.gif;*.jpg;*.jpeg;*.pcx;*.tif;*.png;*.tga;*.wmf), and to the right of this list is a black triangular arrow. Click on that arrow and from the drop-down list choose All Files (*.*). You will then be able to select any file type to attach to the source. Although the file might not display within the Image Viewer, clicking on the area where the image would normally be displayed will open the default program for that file type. e.g. Attach a word-processor document and it might open Microsoft Word, or a PDFThe Portable Document Format (PDF) is a file format developed by Adobe to present documents in their original formatting, independent of software, hardware, and operating systems. PDF files can contain text, graphics, links, and buttons, form fields, audio, video, and document might open Adobe Acrobat.
There are several options for specifying the Image Title and the Linked Filename of the Multimedia Record.
One option, beyond the scope of this tutorial, allows the Image Title to be customised by a template that compiles data from a variety of sources.
See the menubar Tools > Options > Census settings > Census Image Title Template option and the Title & Type Templates tutorial for details.
For this tutorial select Same as source title and tick Rename file to match title, which neatly assigns the same Title to the Multimedia Record and Image Filename as the Source Record.
There is also an option to choose Keywords to classify the image.
Now click the Save button at the bottom.
If using Family Historian Version 4.1 (or later) there may be a prompt to choose the Media folder into which to eventually copy the image file. Click the Yes button, and in the popup click New Folder, create a Census folder, and click OK.
However, if you placed the image file directly into the Media folder or sub-folder, then this prompt is bypassed.
Towards the top of the window, tick Always on top, and close the right-hand panel by clicking the tall thin button labelled >. Drag the window edges to reduce the window size as far as possible. This allows the image to be inspected while entering data on the main screen.
If you prefer to enter data from a printed copy, then close the Image Viewer window by clicking its Close button, and obtain a printout of the 1901_RG13_0603_052_10.jpg census image file.
3. Populate the Census Grid
The next step is to populate the census grid in the centre of the main screen, which imitates much of the data tabulated on the census form.
Hover the mouse over each column heading and the popup tooltip should match the column heading on the census form.
Select Family Members
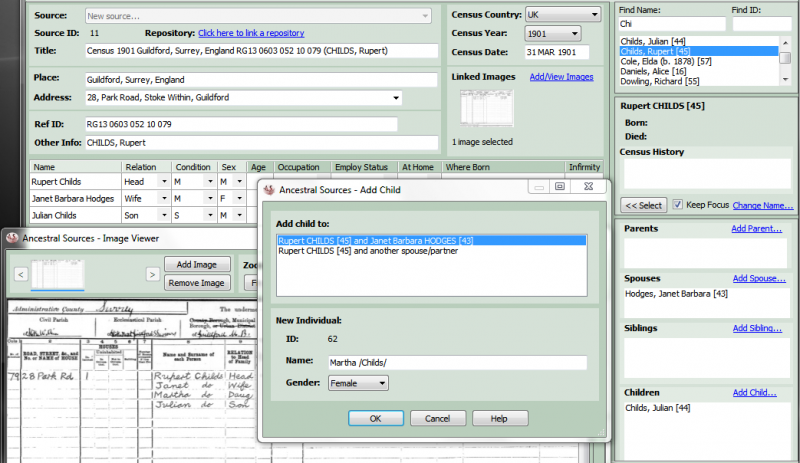
To choose the Head of the household, enter the start of the surname (Chi) into the Find Name box above the family names, and select Rupert from the list. Notice that his family is listed under Spouses and Children below.
To add Rupert to the census grid as Head of the family, click the << Select button, or use Edit > Add current individual to the entry.
Double click on his spouse Janet and child Julian to add them to the census grid as Wife and Son.
The census image and transcript also list his daughter Martha, who does not yet exist in the database.
To add Martha, click on the Add Child… link bottom right, and in the popup select Rupert and Janet as parents.
Enter Martha at the start of the Name box, select Gender as Female, and tick Add to entry following creation of individual.
Click OK and note that Martha is added to the list of Children and to the census grid as Daughter.
NotesFamily Historian version 6 and below supports two types of Notes: Local notes (associated with a single person, record, or fact); and Note Records (sometimes called Shared Notes), that can be linked to multiple records and/or facts. Version 7 introduced:
To undo this Martha child entry, you would use Edit > Review/remove individual data changes.
To add other relatives use the Add Parent…, Add Spouse…, Add Sibling… links.
To add a completely new unrelated person click the + Add unrelated individual button near the middle of the toolbar, or use menubar Edit > New unrelated individual option as explained in Ancestral Sources Tutorial ~ Working With Tools ~ (1) Unrelated Individuals.
Check the Census Grid
Now the Son Julian and Daughter Martha are not in the same order as in the census transcript and image form.
To correct this, click the up arrow button Move selected row up in the census grid, or use Edit > Move selected individual up in the census grid.
Check that the marriage Condition is shown as M = Married for the parents and S = Single for the children. This is necessary for this family because none of them have a Birth Event or Marriage Event recorded to help Ancestral Sources choose the correct Condition.
Finally fill in any missing details in the Census Grid from the census transcript and image form.
For Rupert, Occupation = Clerk and Employ Status = Worker selected from the dropdown list.
For Rupert, Age = 22 and Where Born = Kingston, Surrey, England
For Janet , Age = 21 and Where Born = Chelsea, London, England
For Martha, Age = 2 and Where Born = Guildford, Surrey, England
For Julian, Age = 1m and Where Born = Guildford, Surrey, England
To enter Julian’s age of 1 month, click the button in his Age box and enter 1 against Months.
Notice that the Chelsea and Guildford placesAccording to GEDCOM, a Place should hold "The jurisdictional name of the place where the event took place…" are auto-completed, derived from existing Place field values.

If it is still open, now close the Image Viewer window by clicking its Close button.
It is beyond the scope of this tutorial, but the Census Grid can be customised with a template for each Country and Year.
See the menubar Census > Census Templates option and the Census Grid Templates tutorial for details.
4. Edit Auto Text and Note
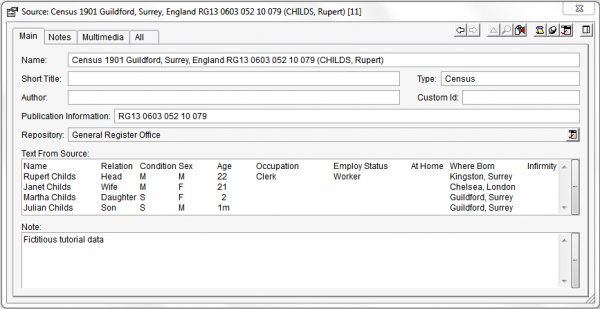
The next two areas below the grid are the Text and Note boxes, which define multi-line text for the Text From SourceBoth Source records and Citations have a Text From Source field intended to hold transcripts of source documents. and Note fields of the Source Record.
Auto Text Transcript
To create an automatic transcript of the Census Grid, click the Auto button, or use Edit > Auto Text.
If there is more than one Census Auto Text Template defined, and therefore offered a choice, select the Default template.
Notice that the data is comma separated, which is perhaps not the easiest to read.
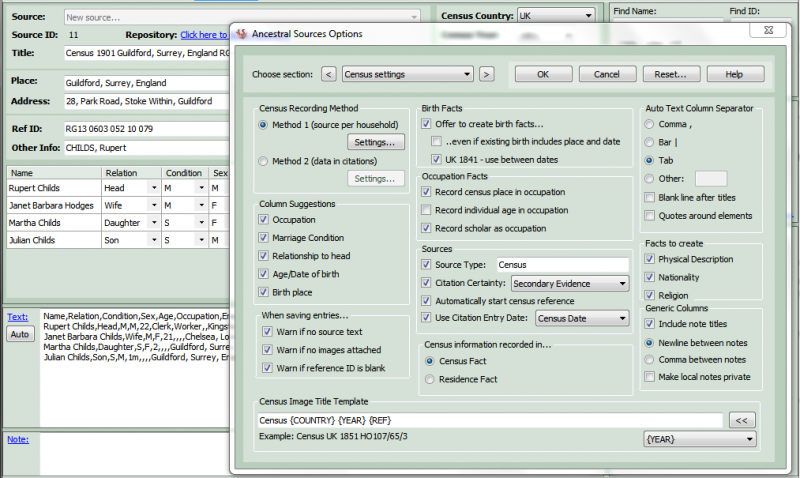
To alter the format, use Tools > Options… > Census settings and under Grid Column Separator top right, select Tab as the column separator.
While in this window, under Sources in the centre, tick both the Citation Certainty and the Use Citation Entry Date options, and then click OK.
Now click the Auto button again, and the Text will be tab separated.
For more advice on how to format the Text From Source field and obtain a tidy presentation in both Source Records and printed Reports, see how to Tabulate Multiline Text in Records and Reports.
In V2 there is an Auto tick box option that allows any further changes made to the data to be automatically updated in the Text box.
To further edit the text, click the Text… link to obtain a large editing window. Delete middle name Barbara from Janet Child and remove , England from Where Born as they do not appear in the Census record, and enter a few extra tab characters to align the columns.
There may be others listed in the Census record, who are not relations, and do not need Individual Records created. This is the place to enter those people’s details to complete the transcript.
Click OK when satisfied that the transcript accurately reflects the Census record.
![]()
It is beyond the scope of this tutorial, but the Text box can be customised with a template that compiles data from many fields, to generate a more complete transcript.
See the menubar Tools > Autotext Template Editor options and the Auto Text Templates tutorial for details.
Source Note
The Note box can be similarly edited via the Note… link, and possibly should say Fictitious tutorial data.
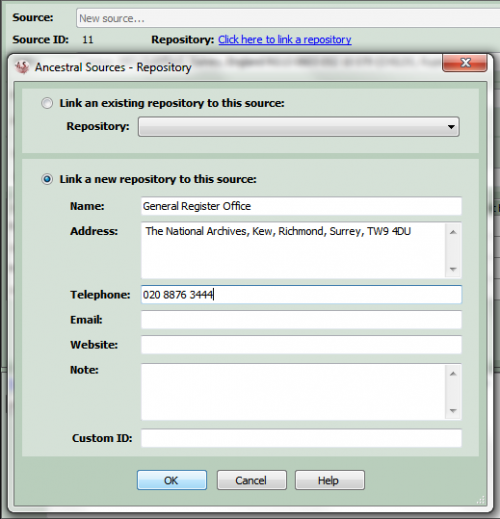
5. Create Repository Link
In the same way that a Source cites the derivation of one or more FactsFacts are one of the key concepts at the heart of Family Historian; they are how you record the things that happened to, or described, each ancestor (Individual)., a Repository cites the owner of one or more original Source documents.
The ability to create a Repository link was not available in Version 1.1 and can be disabled in later versions with Tools > Options > General settings.
Repository Link
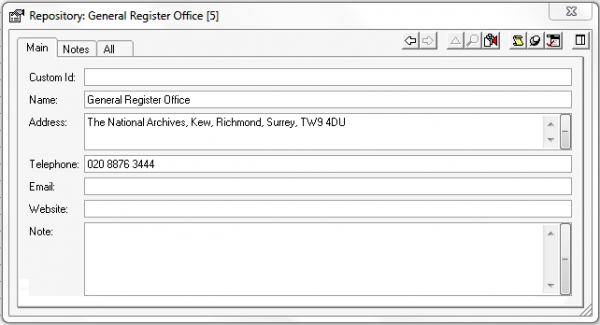
UK 1901 Census recordsCensus records are national collections of population statistics. They usually record details about members of a household on a particular date, and are typically collected every ten years. are lodged with the General Register Office.
So to cite this as the Repository, use the Link a repository… option.
In the Repository window select Link a new repository to this source.
Enter the Name as General Register Office, the Address as General Register Office, PO Box 2, Southport, PR8 2JD and the Telephone as 0300 123 1837
Click OK to close the window.
Alternatively, the Repository could cite an online genealogy website, such as Ancestry UK or Find My Past, from where the census source recordsSource: "where information was found". This could be anything from an archive in a county records office, a book, or even a relative's recorded recollection. Citing your Sources helps to show how you reached a particular conclusion about an Individual. were downloaded.
Other UK Census records would simply link this existing Repository to the Source.
6. Save to Family Historian
This is the final step, so before committing the data to be saved, just check it over carefully.
After the data has been saved, it can be examined in Family Historian, and modified if necessary.
Save Entry to File
When satisfied, click the Save File button near the left of the toolbar, or use File > Save Entry To File.
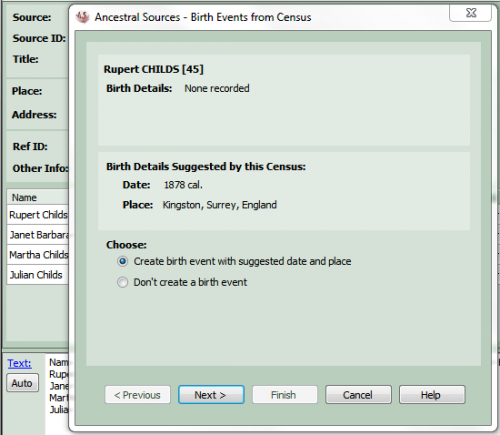
For each person’s Birth Event, where better Date or Place details are suggested by this Census, a popup window offers options to accept or reject the suggestions.
The suggested birth DateWhen an Event happened, or an Attrribute was true. is calculated from the Age column in the Census Grid, and the birth Place is derived from the Where Born column.
Various Birth Event options can be selected by using Tools > Options… > General settings and Census settings.
Since the CHILDS family has no Birth Events recorded, choose Create birth event with suggested date and place, and click the Next > button for each person, and finally click the Finish button.
Then, and only then, will Ancestral Sources commit the data entry to the GEDCOM database.
If you use Tools > View Log Files… it show a comprehensive list of all the changes made.
Finally, close Ancestral Sources by using the File > Exit option.
7. Examine Family Historian
Now let us examine the Family Historian data to see how much information Ancestral Sources has automatically added.
Family Historian Data
Run Family Historian and open the Family Historian Sample ProjectA Project is a Windows folder, created by Family Historian, which contains all your Family Tree information recorded in Family Historian. Normally located in the Documents\Family Historian Projects folder..
Locate the Head of the family Rupert CHILDS, open his Property BoxThe Property Box is the primary window for data entry and for viewing details of stored records. It is used with records of all types. , and ensure Show Sources is enabled.
Individual Details
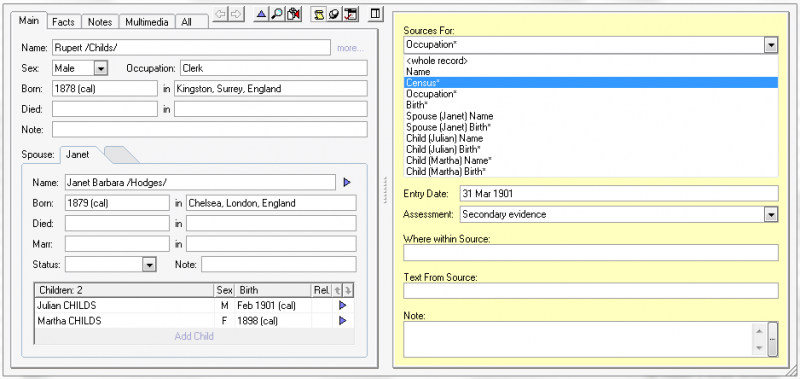
Apart from the Name & Gender of the three original family members, all other data was created by Ancestral Sources.
Click on any data field to see the Census Source citationA link between a source and a fact, documenting Where within the source you find information being "cited" to support the fact/conclusion., with its Entry Date and Assessment completed.
Alternative values for these fields can be chosen via Tools > Options… > Census settings within Ancestral Sources.
In this instance for GRO Census data an Assessment of Primary evidence may be more appropriate.
In the Sources pane, click the Sources For drop-down list, and every entry marked with an asterisk (*) was created and cited by Ancestral Sources.
Select the Facts (or Events) tab for each person, and note that every Event was created by Ancestral Sources, including the Date, Age, Place and Address details.
For example, the Census event shows the Date, Age, Place and Address of Rupert CHILDS in the 1901 Census.
The Occupation attributeEvents are things that happened to an Individual and Attributes are things that described them. assumes he worked in the same Place as the Census, but not at the same Address.
However, such assumptions can be changed via Tools > Options… > Census settings within Ancestral Sources.
Since Family Historian Version 6, the Facts tab and Sources For pane have a Show Media button in their central toolbars, offering a shortcut to any associated Media images.
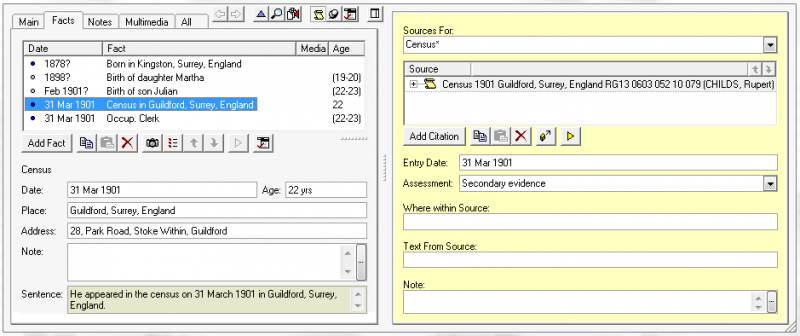
Source Record
Open the one Source Census Record that is cited by all those Facts, and notice how all the new data is presented.
If for example, anyone ever asks how you know that Rupert was a Clerk in 1901, you can easily find the Source of that information.
Note that the Title, Type, Publication Information, Repository, and Text From Source census transcript, were all automatically inserted by Ancestral Sources.
Click on the Repository icon to the right, and select Go to Repository record to review the GRO Repository contact details of the owner of the original source document.
Go Back to the Source Record and select the Multimedia (or Objects) tab to see the linked Census Image file with its Date set to the Census date.
Summary
A Census record that took just a few minutes to enter in Ancestral Sources has created many new Facts and a new Individual, all citing a new Source, which is linked to a new Repository and a new Multimedia record.
It could have all been done in Family Historian without Ancestral Sources, but it would probably have taken at least three times as long, using a tedious and repetitive set of steps.
This is the end of the census tutorial. Please select another tutorial or Restore Original Settings.