Introduction
Sources are an essential part of recording the results of your Genealogy research; they help you, and others, understand how you reached a particular conclusion — and where you might be mistaken. Time spent deciding your approach to Sources and Citations will be well spent — we often see users, even long-standing users, rethinking this, and it can be a lot of work to change the way you do things to get better results.
This article describes how to work with Sources in Family Historian (ƒh) version 7. It should be useful to:
- Users who are new to genealogy as well as to ƒh.
- Users who have experience with Genealogy, but are only just starting to work with ƒh.
- Users wanting a refresher on how to work with Sources and Citations, especially if they are revising their approach.
If you’re new to ƒh and/or Genealogy, you may wish to work through our Getting Starting guide first. You should also review the ƒh Help file sections on Source Records, Property Box: Main Tab for Source Records, and Sources and Source Citations.
If you’re using ƒh version 6, you should read instead Working with Sources and Citations in Version 6 and below.
What are Sources and Citations?
What is a Source?
A Source is a historical record that gives you information about your ancestors. It could be, for example:
- An entry in a Civil Registration Index
- A Certificate of Birth, Marriage or Death
- A Census return
- A Parish Register
- A Will
- A Monumental Inscription (Gravestone)
- A Letter or Email
- A Voice Recording or a Transcript of a Conversation
- A Passenger List or City Directory
- An original document you viewed when you visited an Archive
- A Newspaper or Book
- A Website
Historical in this context doesn’t mean old — you might have recorded Great Aunt Peggy telling her life story last week, but that’s still a historical record.
You should enter enough information about a source that you’ve used to enable you (and other people) to find it again. You can also add the following to a Source record:
- Text from Source, which is a full or partial transcription of the Source (useful if the source isn’t very legible and having puzzled your way through it once, you don’t want to repeat the exercise; or if you want to share details with others but don’t have the necessary rights to share an image).
- Notes, which allows you to record comments about the Source, for example, ‘half the page was burned and illegible so some details aren’t available’
- Media, for viewing one or more images etc. of the Source.
What is a Citation?
You won’t spend long doing genealogy before you’re advised to ‘cite your sources’. You’ve probably seen it in this Knowledge Base a few times already.
‘Citing your source’ means recording for your own benefit, and for the benefit of anyone else who sees your research, why you believe that something — a Name, a Fact, a Note — is correct, i.e. that it’s based on information in a Source that has been interpreted correctly.
When you cite your source, you do it by creating a Citation to link the Fact etc. to a Source. Optionally, you can provide information with the Citation to help yourself (and others) to understand why you drew the conclusions that you did from the Source. This might include:
- where exactly in the source did I find the relevant information, which could be e.g. a volume/page number, or identifying details from an index
- some Text from the Source
- how reliable do you think the information is
- when was the information in the source created
- NotesFamily Historian version 6 and below supports two types of Notes: Local notes (associated with a single person, record, or fact); and Note Records (sometimes called Shared Notes), that can be linked to multiple records and/or facts. Version 7 introduced about the citation
- Media, for viewing one or more images relevant to the citation, e.g. an image of part of a large Source.
Two Types of Sources in Family Historian 7
ƒh7 supports two types of sources: Sources created using Source Templates, and Generic SourcesFamily Historian 7 introduced the concept of 'Templated Sources' and renamed Version 6 (totally Gedcom compliant) sources as 'Generic Sources'. .
Source Templates make it simple to record information identifying sources in a consistent, clear manner. It does this by allowing you to capture the information about a source in a set of fields specific to the kind of source you’re recording.
For example, if you’re recording a Baptism or Burial source, you might record some or all of:
- The type of church register concerned (Parish Register, Bishop’s Transcript, Non-conformist register)
- The type of eventEvents are things that happened to an Individual and Attributes are things that described them. (Baptism or Burial)
- The name of the individual concerned
- The dateWhen an Event happened, or an Attrribute was true. of the event
- The church or chapel
- The location (placeAccording to GEDCOM, a Place should hold "The jurisdictional name of the place where the event took place…" ) of the church or chapel
- A reference to identify where in the register the entry can be found
- A repositoryA repository is a place (physical or online) where collections of original source data are stored and maintained. (link to repository record) or online data collection
- A URL for an online version of the source
And if you’re recording a Birth or Death Certificate source, you might record some or all of:
- The certificate type (Birth or Death)
- The region where the certificate was issued (England & Wales, Australia, etc.)
- The name of the individual concerned
- The date of the event
- The location (place) of the event
- The address"The address structure should be formed as it would appear on a mailing label…", according to GEDCOM; however, this is capable of a number of interpretations, and Address and Place are best considered together. of the event
- A reference for the certificate (e.g. volume or register number, and page or entry number)
- A repository (link to repository record) or online data collection
- A URL for an online version of the source
Source Templates not only determine what fields are available to identify a source of a particular kind; they also identify what fields should be included in citation-level information for a source of that kind. So, for example, if you’re a ‘splitter’ (typically many sources, few citations per source), you’ll use templates that include most of the source information in the source fields, including Text from SourceBoth Source records and Citations have a Text From Source field intended to hold transcripts of source documents., and less information in the citation-level fields (such as the Citation Assessment and possibly a Citation Note). And if you’re a ‘lumper’ (typically fewer sources, many citations per source), you’ll use templates that include fewer source fields and more citation fields. As always, ƒh is flexible enough to allow you to mix-and-match the different types of source information — a template for a birth registration index would usually have more citation-level fields than a template for a birth registration certificate.
ƒh7 uses the information you’ve provided in the template-specific fields to create the following display elements:
- A source (record) title
- A footnote and a short footnote
- A bibliography entry
You can customize all of the above per source template (although initially you’ll want to use the default settings), and use them in reports, or in the Citation List Pane which shows the Sources cited for a particular fact (see Citation List Pane.)
By contrast, when using Generic Sources in ƒh7, you have to fit the relevant information into a fixed (and much less specific) set of fields defined by the GedcomGEDCOM, an acronym for GEnealogical Data COMmunication, is a specification for exchanging genealogical data between different genealogy software. It is a file format that most genealogical programs and online trees recognise. standard:
- Title
- Generic Type
- Author
- Custom ID
- Short Title
- Publication Info
- Repository (link to a repository record)
See GEDCOM Source Fields for more detail.
You cannot customise ƒh7 to automatically generate the Title for Generic Sources; however, you can customise the structure of Footnotes, Short Footnotes and Bibliography entries (which will be the same for all Generic Sources).
Should I Use Source Templates?
Templates make source data entry and display easier (and we recommend them if there’s no reason not to use them) especially if:
- You’re new to Genealogy and ƒh and do not have Generic Sources to convert.
- You’re embarking on a total rebuild of your tree from scratch.
- You want to produce reports that conform to a particular citation format, such as the work of Elizabeth Shown Mills (in her book Evidence Explained) or the work done at the University of Strathclyde.
However, there are reasons you might decide to use Generic Sources instead:
- You’ve imported a lot of Sources from another product as Generic Sources. Although it’s possible to write pluginsPlugins are small programs that allow new features to be added without upgrading Family Historian itself; some plugins are written by Calico Pie and others are written by users. to convert Generic Sources to Templated SourcesFamily Historian Version 7 introduced the ability to define sources using 'Source Templates' to aid precision and consistency in entering source-identifying information. if you have a well-defined source structure, it isn’t a task that everyone will be willing or able to undertake; and because every user will have structured their sources differently, each user will need to take a different approach. If your Sources are not highly structured, converting them into Templated Sources will be a manual task and you may think it offers little benefit.
- You regularly export a Gedcom file, for example to share data with others or to generate a website. Other programs may do a better job of importing Generic Sources, but see Exporting Templated Sources for some steps you can take on export.
It is possible to retain existing Generic Sources (created on import) and use Templates to create new sources, but before adopting this practice, you should assess how consistent your reports will appear and whether that matters to you. Consistent reports will look more ‘professional’ but you may not care about that.
Both Templated Sources and Generic Sources can benefit from Autotext, source-driven data entrySource-Driven Data Entry is a workflow that starts when you acquire a source, moves on to entering the details of that source and then on to creating the facts about people that you glean from the source (often automatically creating and the options for recording Citation AssessmentsA Citation Assessment is a record of how credible you believe a piece of information in a source to be, when you have relied on that information to reach a conclusion about a fact..
Which Templates Should I Use?
ƒh7 comes with two collections of templates: the Essentials Collection and the Advanced Collection.
The Essentials collection was designed by Calico PieCalico Pie Limited is a UK software house, and the publishers of Family Historian., based on input from experts at the University of Strathclyde and elsewhere, and contains 16 templates that should cover the most common source types. Although they are not as detailed as the Advanced templates, they should be a good balance between precision and complexity for most users. We recommend you start with these Templates unless you are already familiar with the work of Elizabeth Shown Mills and wish to adopt her standards.
The Advanced collection contains 169 highly-detailed templates based on the work of Elizabeth Shown Mills, whose book Evidence Explained is widely used by professional/advanced genealogists to help to generate standard citations. However, even with templates, Evidence Explained compliant source recordsSource: "where information was found". This could be anything from an archive in a county records office, a book, or even a relative's recorded recollection. Citing your Sources helps to show how you reached a particular conclusion about an Individual. can be a lot of work to create and are overkill for many people.
You can also create custom versions of any of the templates supplied (by copying them and customising the copy; you cannot edit the standard templates) or create your own templates. Or you can mix and match custom templates, Essential Templates, Advanced Templates and Generic Sources. However, we advise you always use the same approach for the same source type!
See Adding, Customising and Sharing Source Templates in Version 7 for more on making the Templates you choose available and customising them to meet your needs.
How Many Sources do I Need?
There are, broadly speaking, two approaches to creating Sources and citing those Sources. You’ll find these referred to in various places as Method 1 (“Source Splitters”) and Method 2 (“Source Lumpers”).
“Splitters” create Sources at a very granular level — so every Birth Certificate, every Household Schedule within a CensusCensus records are national collections of population statistics. They usually record details about members of a household on a particular date, and are typically collected every ten years., every entry in a Electoral Roll is a separate Source. All or almost all of the data needed to identify the Source and the relevant information within it goes in the Source record, and Citations hold little or no information. This approach results in the creation of large numbers of Source Records (which ƒh is very capable of dealing with, so you need not worry about creating ‘too many sources’).
“Lumpers” prefer more general Sources — e.g Birth CertificatesBirth Certificates are a formal record of the birth of a child, and typically include the date and place of birth together with information about the parents., the 1881 Census (or even all Censuses) There is very little information in the Source record, other than perhaps where to find the collection of records, and much more information in the Citations.
Your choice of approach has a number of consequences for how you do things, but there is no right or wrong choice, just the approach that suits you best. Many people adopt Splitting for some Sources and Lumping for others.
See Citing Sources: Method 1 and Method 2 for a discussion of the options.
Sources created with Templates in ƒh7 can be structured to fit both ways of working, as it is possible to define what information should be held at the Source level and what in the Citation.
Creating and Using Sources and Citations
There are three methods of creating a Source and/or Citation in ƒh7.
Method 1 (The Source Button)
The Source button ![]() on the main toolbar allows you to create a source, and optionally prepare a citation to it, or to prepare a citation to an existing source. (You can also view your current Prepared Citation, or Help specific to using the Source button). Even if you don’t want to prepare a citation, it is the quickest method of creating a Source.
on the main toolbar allows you to create a source, and optionally prepare a citation to it, or to prepare a citation to an existing source. (You can also view your current Prepared Citation, or Help specific to using the Source button). Even if you don’t want to prepare a citation, it is the quickest method of creating a Source.
Add > Source/Citation also allows you to create a source, and optionally prepare a citation to it, or prepare a citation to an existing source.
Both methods are gateways to source-driven data entry, and open the Prepared Citation window:
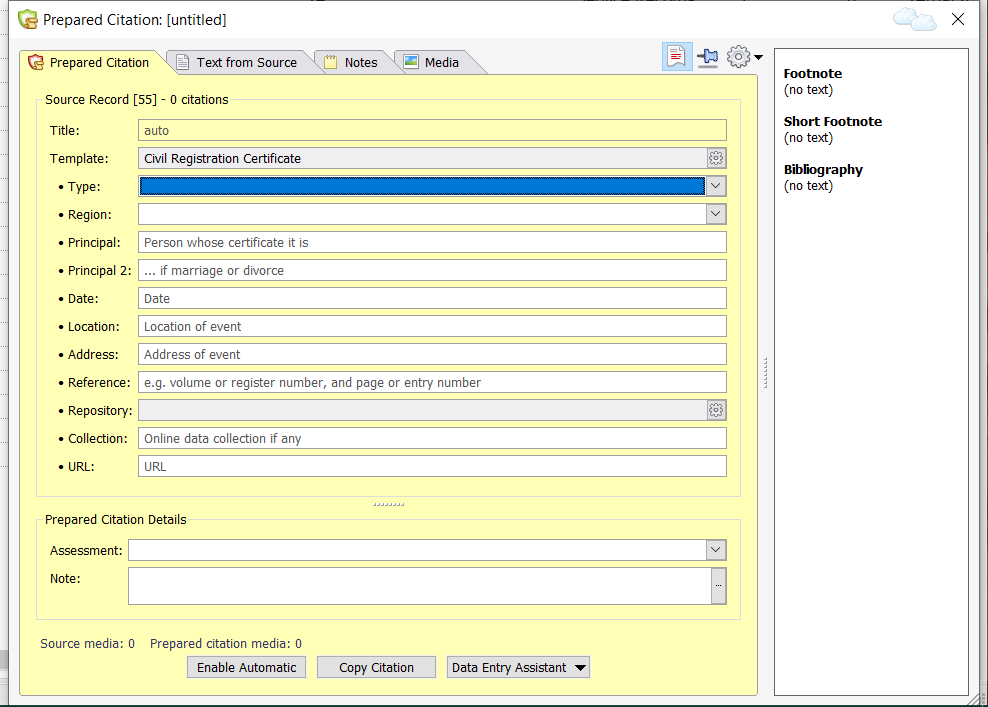
As well as entering the data for your source and optional prepared citation, you can see the automatically generated Footnotes, Bibliography entry and Title (Title is only automatically generated for a Source created from a Template). If you want to show/hide the side panel for footnotes etc. click the Show Side Panel ![]() button to toggle visibility.
button to toggle visibility.
Text from Source, Notes and Media have their own tabs; each can be used to add Text from Source, Notes or Media to either the Source or Citation.
You may wish to customise the Citation main tab to include Text from Source or Notes for quick access. (Any customisations you make here will also apply to the Citation window under Method 2.).
There are buttons on the bottom that allow you to use a Prepared Citation in a number of contexts.
Method 2 (Add a Citation to an Existing Fact)

The Add Citation button ![]() at the bottom of the Citation List Pane associated with an Individual’s Property BoxThe Property Box is the primary window for data entry and for viewing details of stored records. It is used with records of all types. allows you to cite an existing source, or create and cite a new source, in support of a fact you’ve already created.
at the bottom of the Citation List Pane associated with an Individual’s Property BoxThe Property Box is the primary window for data entry and for viewing details of stored records. It is used with records of all types. allows you to cite an existing source, or create and cite a new source, in support of a fact you’ve already created.
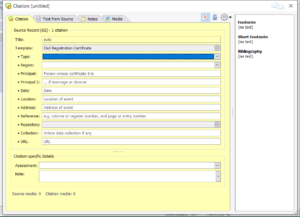
It opens a Citation Window, where you can view or create a source and add citation-specific data, which creates a citation for the currently selected fact. As well as entering the data for your source, you can see the automatically generated Footnotes, Bibliography entry and Title (only automatically generated for a Source created from a Template). If you want to show/hide the side panel for footnotes etc. click the Show Side Panel ![]() button to toggle visibility.
button to toggle visibility.
Text from Source, Notes and Media have their own tabs; each can be used to add the relevant item to either the Source or Citation.
You may wish to customise the Citation main tab to include Text from Source or Notes for quick access. (Any customisations you make here will also apply to the Citation window under Method 1.)
Method 3 (Blank Generic Source)

Right-click on white space within the Sources Record List and select New Source. This will create a blank Generic Source. If you double-click on the new Source title (“[untitled]”) you can complete the details.
What is a Prepared Citation?
A Prepared Citation is, simply, the combination of:
- A source
- Some associated citation-level data prepared ready for use (when the source is cited against a fact)
It is not a citation linking a source and a fact, but a means to create such a citation easily and consistently.
There can only be one Prepared Citation in existence in a projectA Project is a Windows folder, created by Family Historian, which contains all your Family Tree information recorded in Family Historian. Normally located in the Documents\Family Historian Projects folder. (the most recently created one). It is saved in the Header Record (although you don’t need to know that to use it), and is preserved over a restart of ƒh, which is convenient if you’re working with a complex source and need to construct a lot of facts over a number of work sessions.
To view/use your current Prepared Citation, use View > Prepared Citation or select the Source button ![]() followed by View Prepared Citation.
followed by View Prepared Citation.
Using a Prepared Citation
The buttons at the bottom of the Prepared Citation window offer three ways to use the Prepared Citation:
- The Data Entry Assistant button
 allows you to run a special type of plugin called a Data Entry Assistant (or DEA). A DEA typically takes data you’ve entered into Source fields, and prompts for extra data that is contained in the Source, and uses that data to create related facts and the relevant Text from Source. (This is often referred to as source-driven data entry). On completion, a DEA will display a list of every Fact it created or updated, so that you can verify what has been done, edit the changes if necessary or undo all the changes using (using Edit > Undo Plugin Updates.)DEAs are written by members of the user community and downloaded from the Plugin StorePublished plugins can be downloaded from the Family Historian Plugin Store., just like other plugins. The DEA button allows you to choose a plugin to run, to read about DEAs and the specific DEAs available for the kind of Source you’ve created, or to browse the ƒh Plugin Store for new and updated DEAs.
It may be that there is no DEA for the kind of Source, you’re working with, or you might prefer to create Facts and their associated Citations manually, in which case you have two further options to use your Prepared Citation:
- The Enable Automatic button opens the Automatic Source CitationAutomatic Source Citation is a very powerful tool to ensure you remember to cite Sources for all your conclusions. Pane and enables Automatic Source Citations based on your Prepared Citatation. (See Automatic Source Citation Help).
- The Copy Citation button copies the Prepared Citation to the clipboard; you can then use it to paste a citation to any fact you choose using the Paste Citation from Source Clipboard button at the bottom of the Citation List Pane associated with an Individual’s Property Box.
Adding Media to Sources and Citations
If you have an electronic copy of a Source (for example, a scanned or downloaded image or certificate, or a text document), you will find it helpful to link it to the associated Source (for Method 1) or Citation (for Method 2). Doing so will allow you to review the contents of the source quickly when necessary, and (if you wish) to include the source image in reports/websites.
Before you start adding Media to Sources and Citations, you should review the article on Multimedia File Formats to understand what file formats ƒh will handle internally; and note that only Image files are displayed in Diagrams and Reports.
If your Source document is a PDFThe Portable Document Format (PDF) is a file format developed by Adobe to present documents in their original formatting, independent of software, hardware, and operating systems. PDF files can contain text, graphics, links, and buttons, form fields, audio, video, and, you are advised to convert it to one or more image files using a Graphics Package such as PDF to Image File Converter. If your Source document is a Text or Word Processing document, you might prefer to cut and paste the content into Text From Source.
To add Media, go the the Media tab on any of:
- The Prepared Citation Window (which will allow you to add Media to the Source or to the Prepared Citation for inclusion in every Citation created from it).
- A Citation Window (which will allow you to add Media to the Source or to that specific Citation)
- The Property Box for a Source (which will allow you to add Media to that Source).
In all cases, use the Add Media button ![]() to create a new Media recordWhen you add a picture, video, sound recording, document file etc into a Family Historian project, a Media record is created to represent that media item within the project; the Media record includes a link to the actual Media file. (Insert from File) or Link to Existing Media Record. You will be prompted to specify whether you want to add the Media to the Source or Citation (where relevant).
to create a new Media recordWhen you add a picture, video, sound recording, document file etc into a Family Historian project, a Media record is created to represent that media item within the project; the Media record includes a link to the actual Media file. (Insert from File) or Link to Existing Media Record. You will be prompted to specify whether you want to add the Media to the Source or Citation (where relevant).
- If you Insert from File, you’ll be asked to specify the location for the media file, and a name to save it with.
- If you Link to Existing Media Record, you’ll be prompted to identify the Media Record.
- If your Source consists of more than one file, repeat for every file.
You can also create and link to a new Media Record by dragging-and-dropping a file into the Media window.
Viewing Sources and Citations
- To view a Source, double click on it in the Source Records List (accessed via View > Other Records Lists > Sources).
- To view your current Prepared Citation, use View > Prepared Citation or use the Source button followed by View Prepared Citation.
- To view a Source with an associated Citation, double click on the appropriate item in the Citation List Pane associated with an Individual’s Property Box. (Choose what is displayed to identify the Source/Citation in the Citation List Pane, by clicking on the icon at the bottom of the Source Pane and choosing Display Citation As >)
- To view all Citations for a Source, use the Options menu when viewing a Source or a Citation and select Show Source Record’s Citations in Result Window.
Including Sources and Citations in Reports

If you’re creating a Report about individuals, you can choose to show Source Citations for the Facts in the report. The Sources Options tab allows you to control if and how they are displayed.
The Footnote format will be displayed (although you have the option to use the Short Footnote format for citations to already-cited sources.) You can also optionally include a Bibliography at the end of the report.
Note: Although you can customise e.g. the Footnote for a particular kind of Source to include Text from Source and/or Source Notes, If you want to include Text from Source and/or Notes in Footnotes, it is best to append them using the Report Options, otherwise they will be truncated.
ƒh7 also has a ‘Sources and Citations’ report which shows details of one or more sources with a list of the citations to them.
An Alternative Way to Work with Facts, Sources and Citations
Many people —once they understand the basics of Facts, Sources and Citations; and have decided how they want to organise their Sources — find Ancestral Sources a useful alternative to the source-driven data entry facilities within ƒh.