Introduction
In addition to entering factsFacts are one of the key concepts at the heart of Family Historian; they are how you record the things that happened to, or described, each ancestor (Individual)., there are a variety of other tools for manipulating your GEDCOMGEDCOM, an acronym for GEnealogical Data COMmunication, is a specification for exchanging genealogical data between different genealogy software. It is a file format that most genealogical programs and online trees recognise. database. All the Options, Templates, and Tools settings apply equally to all Projects, but they can be different in each Windows User Account.
They are based on very old versions of Ancestral SourcesAncestral Sources is a utility written by Nick Walker, designed to be used in conjunction with Family Historian to allow faster, more convenient creation of Census, Birth, Baptism, Marriage, Death and Burial/Cremation records. and Family Historian, so do not include some of the features that are now available such as templated sourcesFamily Historian Version 7 introduced the ability to define sources using 'Source Templates' to aid precision and consistency in entering source-identifying information. and rich-text. Videos that refer to those new features are available on the Ancestral Sources Videos page. However, the fundamental concepts are still reasonably relevant.
Throughout the tutorials the notation ‘Option1 > Option2 > Option3 button’ means select menubar Option1, then Option2, and finally click the Option3 button.
It is feasible to copy & paste many of the data values from the tutorial scripts directly into Ancestral Sources input forms.
Before you start the tutorials please Configure Initial Settings.
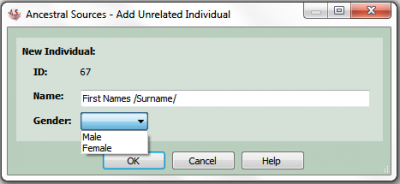
Add Unrelated Individual
In addition to the Add Parent…, Add Spouse…, Add Sibling…, and Add Child… links there is also an Add Unrelated Individual option.
New Unrelated Individual
- Open Ancestral Sources and ensure the Family Historian Sample ProjectA Project is a Windows folder, created by Family Historian, which contains all your Family Tree information recorded in Family Historian. Normally located in the Documents\Family Historian Projects folder. opens by default, but if not then Configure Initial Settings.
- Click the + Add unrelated individual button near the middle of the toolbar, or use menubar Edit > New unrelated individual option.
 In the Name field type in any name using the format First Names /Surname/.
- Select the Gender from the drop-down list.
- If CensusCensus records are national collections of population statistics. They usually record details about members of a household on a particular date, and are typically collected every ten years. Editor mode applies, there is an option to Add to entry following creation of individual, that will create the new individual and add them to the census grid in a single step.
- Finally click OK.
- The Individual record will be added to Family Historian with the record ID shown only when the current data entry is saved.
- Use menubar option Edit > Review/remove individual data changes…, select the Individual just created and click the Delete button to undo the entry.
- Close Ancestral Sources.
 In the Name field type in any name using the format First Names /Surname/.
Add Images to Sources
Sometimes supporting images or media only come to light after a data entry has been committed to Family Historian.
These images or media can be added to a Source recordSource: "where information was found". This could be anything from an archive in a county records office, a book, or even a relative's recorded recollection. Citing your Sources helps to show how you reached a particular conclusion about an Individual. using the Family Historian add Multimedia options, or by using the Ancestral Sources Add Images to Existing Sources tools. Note that any type of media file can be added, not just image files.
Add Images to Existing Sources
- Open Ancestral Sources and ensure the Family Historian Sample Project opens by default, but if not then Configure Initial Settings.
- This tutorial works best if the Enter Baptism Facts tutorial has been completed, which creates a Source record without images.
- Select the +Existing Sources mode by clicking the Add images to existing sources button to the right of the toolbar, or by choosing View > Add Images to Existing Sources.
- From the Type drop-down list choose Baptism and tick Only display sources without images.
- From the Source drop-down list choose Baptism Newton, Surrey, England 9 May 1837 Arthur Hodges.
- If this Source does not exist, try another Type or un-tick Only display sources without images.
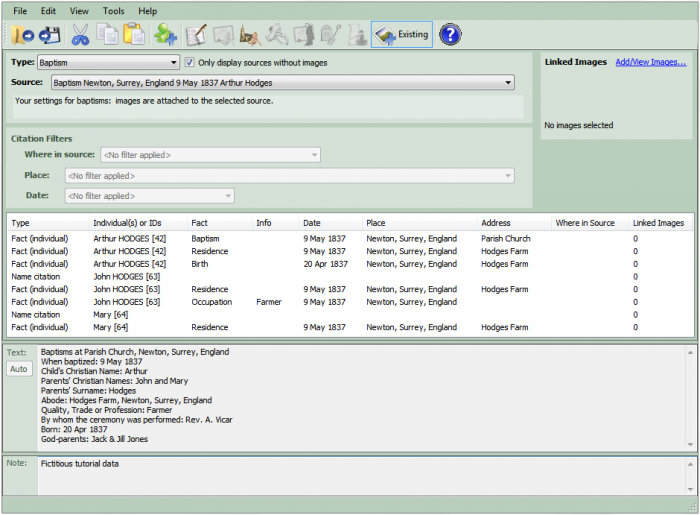
- To open the Image Viewer, either use Edit > Add/View Images… or click the Add/View Images link in the Linked Images panel.
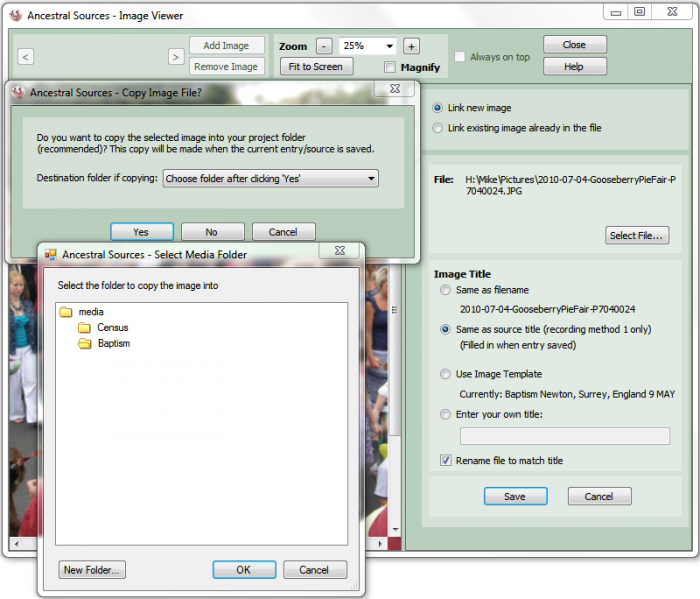
- Ensure the Link new image option is selected, then click the Select File… button, and Open any image file, perhaps from My Pictures. This image file should appear in the image panel on the left.
- You can in fact add any type of file, not just image files. In the Open file window, near the lower right corner, it lists Image Files (
*.bmp;*.gif;*.jpg;*.jpeg;*.pcx;*.tif;*.png;*.tga;*.wmf), and to the right of this list is a black triangular arrow. Click on that arrow and from the drop-down list choose All Files (*.*). You will then be able to select any file type to attach to the source. Although the file might not display within the Image Viewer, clicking on the area where the image would normally be displayed will open the default program for that file type. e.g. If you attach a word-processor document then it might open Microsoft Word. - There are several options for specifying the Image Title and the Linked Filename of the MultimediaWhen you add a picture, video, sound recording, document file etc into a Family Historian project, a Media record is created to represent that media item within the project; the Media record includes a link to the actual Media file. Record.
One option, beyond the scope of this tutorial, allows the Image Title to be customised by a template that compiles data from a variety of sources. See the Title & Type Templates tutorial for details. - For this tutorial select Same as source title and tick Rename file to match title, which neatly assigns the same Title to the Multimedia Record and Image Filename as the Source Record.
- There is also an option to choose Keywords to classify the image.
- Now click the Save button at the bottom.
- If using Family Historian Version 4.1 (or later) there may be a prompt to choose the Media folder into which to eventually copy the image file. Click the Yes button, and in the popup click New Folder, create a Baptism folder, and click OK. However, if the image file is already in the Media folder or sub-folder, then this prompt is bypassed.
- Close the Image Viewer window by clicking its Close button at the top.
- When satisfied, click the Save File button near the left of the toolbar, or use File > Save Entry To File.
- Finally, close Ancestral Sources by using the File > Exit option.
When you’ve completed the tutorials you should Restore Original Settings.