Introduction
Many people will install Family Historian on 2 PCs, which is allowed by the terms of the licence:
The Software must not be installed on more than one computer terminal at any one time, except that you may install it onto 2 computers (and no more than 2) if both computers are owned and kept by you, and no more than one person ever uses the software at any one time.
To work effectively with 2 PCs — especially to avoid data loss — it is essential to keep ƒh data and settings synchronised between the 2 PCs, so that changes you make on one PC are repeated on the 2nd PC. You should also ensure that you are running the same version of ƒh on both PCs (this is especially important if one of the PCs is running V7 as V7 uses a different file format from earlier versions).
The main options for keeping two PCs in synchronisation are:
- Using an online data synchronisation service, such as DropBox, Google Drive or Microsoft OneDrive.
- Using a USB flash drive.
Synchronising your Project Data
Using an Online Synchronisation Service
There are a number of online synchronisation services, but the ‘big three’ are Dropbox, Google Drive and Microsoft OneDrive.
Dropbox
Dropbox is easy to use and has been reported as working well by several users. You can have 2 GB of space free and any file changes are automatically synced to other computers with the same sign-on.
If your file storage exceeds 2 GB in total, you can pay for extra at about £10 per month or £96 per year per 2TB (Choose your Dropbox plan).
You can add 0.5 GB for free by completing the quests on the Get Started tab or contributing to the Dropbox Community forum. You can also add 0.5 GB for each friend referred through the referral program – see the Dropbox FAQ Get more storage space on your Dropbox account for full details.
Even with one PC, the Dropbox online store provides a useful short-term backup facility. Dropbox makes automatic backups of any changes, where you can download or restore backups if you need them for 30 days. Also File Versions are supported.
There is no maximum single file size, except when used via a browser when the limit is 10 GB.
Dropbox uses modern encryption methods to both transfer and store the files, including Transport Layer Security (TLS)/Secure Sockets Layer (SSL) and AES-256 bit encryption.
Dropbox synchronises most Windows PC, Apple Mac, tablets & phones (iOS, Android, Windows, BlackBerry, Kindle Fire), and Linux (Ubuntu, Fedora, Debian, etc). Alternatively, files can be accessed via most web browsers.
See the Dropbox Features for more details.
Family Historian Synchronisation
The process for using Dropbox is straightforward, assuming you have all your media within your Project folder.
- Register for Dropbox
- Install the FH program on both PC, and use the same Dropbox Account on both PC
- Use Windows/File Explorer to move your ƒh Projects folder into the Dropbox folder created in Documents (My Documents) on your main PC
- Start ƒh and via File > Project Window select More Tasks, then Project List and then Choose Location for Projects and point it to the folder you just moved into the Dropbox folder
- Wait a while, which may be many hours for large Projects or slow Internet connections
- Check the second PC has the files, and Choose Location for Projects as above
Now on whichever PC you change Project data, it is copied to the other PC automatically via the Dropbox online file store.
Boxifier lets you sync any folders to DropBox while keeping the folders elsewhere, and is free of charge for a single folder.
Google Drive
Google Drive is a free application that synchronizes files and folders between computers via an online Drive that requires a Google Account such as Gmail. It offers 15 GB of free storage to share between Google Drive, Gmail, and Google+ Photos and allows files to be shared with individuals, groups, or networks. More storage can be purchased if required, for about £1.20 per month per 100 GB (Google Drive Storage Plans).
Even with one PC, the Google Drive online store provides a useful short-term backup facility. Deleted files are automatically moved to the Trash folder from where they can be restored for up to 30 days. Also File Versions are supported.
The general maximum single file size is 5 TB but there are various specific limits defined by Google Docs, Sheets, and Slides size limits.
It appears that files are encrypted in transit by Transport Layer Security (TLS)/Secure Sockets Layer (SSL) but not encrypted within the servers, although there are pluginsPlugins are small programs that allow new features to be added without upgrading Family Historian itself; some plugins are written by Calico Pie and others are written by users. that will.
Google Drive synchronises most Windows PC, Apple Mac, tablets & phones (iOS, Android), but not Linux (although third party support exists via Google Drive Clients). Alternatively, files can be accessed via most web browsers.
To prevent files such as .doc and .txt being converted to Google Docs format, click the Settings cog icon top right, then Settings, untick Convert uploads, and click Done.
See the Google Drive Help Center for more details.
Family Historian Synchronisation
The process for using Google Drive is straightforward, assuming you have all your media within your Project folder.
- In a browser, sign in to your Google Account then click the Apps icon and select Drive.
- Use the Install drive for your computer link to install the software on both PC, using the same Google Account.
- Use Windows/File Explorer to move your ƒh Projects folder into the Google Drive folder created in Documents (My Documents) on your main PC.
- Start ƒh and via File > Project Window select More Tasks, then Project List and then Choose Location for Projects and point it to the folder you just moved into the Google Drive folder
- Wait a while, which may be many hours for large Projects or slow Internet connections.
- Check the second PC has the files, and use Choose Location for Projects as above.
Now on whichever PC you change Project data, it is copied to the other PC automatically via the Google Drive online file store
Microsoft OneDrive
Microsoft OneDrive is an integral feature of Windows since version 8.
It is a free application that synchronizes files and folders between computers via a OneDrive online store that requires a Microsoft Account. It offers 5 GB of free storage space that allows files to be shared with individuals, groups, or networks. Free extra storage comes with Office 365 subscriptions. More storage can be purchased if required, at about £2.00 per month for 100 GB (OneDrive Plans).
Even with one PC, the OneDrive online store provides a useful short-term backup facility. Any files that are deleted will not only be sent to the local PC Recycle Bin, but also eventually to the OneDrive Recycle Bin, where they will reside for up to 30 days. If the OneDrive Recycle Bin files exceed 10% of the OneDrive storage limit, then the oldest files will be permanently deleted.
The maximum single file size supported is 10 GB.
It appears that files are encrypted in transit by Transport Layer Security (TLS)/Secure Sockets Layer (SSL) and Perfect Forward Secrecy (PFS) but not encrypted within the servers.
OneDrive synchronises most Windows PC (except XP), Apple Mac, tablets & phones (iOS, Android, Windows), and Xbox, but not Linux. Alternatively, files can be accessed via most web browsers, even on XP and Linux.
OneDrive offers the option to have Files On Demand (the files are resident in the cloud and only downloaded to your PC when used) or Always Available (resident on your PC but still synchronised with the cloud). The default option is Files On Demand, but it is strongly recommended to make files Always Available. Then Family Historian can still operate with the Project files even without an Internet connection. See OneDrive Files On-Demand for details.
Family Historian Synchronisation
The process for using OneDrive is straightforward, assuming you have all your media within your Project folder.
Conventional method using the OneDrive subfolder
- Run the OneDrive software on both PC, using the same Microsoft Account on both. OneDrive is preinstalled on Windows 8 and 10.
- Use Windows/File Explorer to move your ƒh Projects folder into the OneDrive folder created in Documents (My Documents) on your main PC.
- Start ƒh and via File > Project Window select More Tasks, then Project List and then Choose Location for Projects point it to the folder you just moved into the OneDrive folder.
- Wait a while, which may be many hours for large Projects or slow Internet connections.
- Check the second PC has the files, and use Choose Location for Projects as above.
Alternative method using Auto-save Update Folders option
Although this method still moves files from the Documents folder to the OneDrive\Documents folder, the ƒh File > Project Window > Location does not need changing, because the default Documents path gets automatically redefined.
- Run the OneDrive software on both PC, using the same Microsoft Account on both. OneDrive is preinstalled on Windows 8 and 10.
- Use the OneDrive > Settings > Backup tab, Manage back up button to synch the Documents folder. This includes all files, as well as all Family Historian Projects, so ensure the OneDrive storage space is not exceeded.
- Wait a while, which may be many hours if you have lots of large files in Documents or slow Internet connections.
- Check the second PC has the files in the OneDrive\Documents\Family Historian Projects folder.
Now on whichever PC you change Project data, it is copied to the other PC automatically via the OneDrive online file store.
External Media Files
It is also possible to synchronize Media files held outside the Project folder (e.g. within the general Documents or Pictures folders), but to ensure that file mapping remains constant, the location chosen should have the same absolute file path on the two PCs and be within the main synchronization folder (e.g. C:\Users\(profile name)\OneDrive\Documents\Family History\Media).
A Common Pitfall: Conflicted Copies
A common pitfall that people encounter when using a file synchronisation service to keep their data in step across 2 PCs is that they have the same ƒh Project open on both PCs at the same time (or indeed open the same Project twice on a single PC. This will often result in a ‘conflicted copy’ being produced in the online file store, as described for Dropbox here (the problem is similar for the other synchronisation services.)
If you end up with a conflicted copy of your Project, the safest way forward is to use File>Merge Compare to check the two files against each other and if necessary merge them before deleting the conflicted copy. See Merge/Compare File for more help.
Using a USB Flash Drive (Stick)
A USB drive is a cheap alternative to using an online synchronisation service, but a little more awkward to set up and use. If you go for this option choose a memory stick of a size to suit your purpose. As a guide a 32 Gbyte memory stick will hold the data for at least 16,000 records including all the images, documents etc.
Remember that simple USB flash drives are not designed for long term data storage, and are much more prone to failure or corruption than portable hard drives. They are ideal for transferring data between PCs, but should never be used to store the master or only copy of your data.
USB Drive Letters
One niggling little problem with this method is that each time you move the memory stick from one computer to another the drive letter may change. If this happens, when ƒh is opened you will need to browse for the project or GEDCOMGEDCOM, an acronym for GEnealogical Data COMmunication, is a specification for exchanging genealogical data between different genealogy software. It is a file format that most genealogical programs and online trees recognise. file to open it. This can be overcome by following the steps below so that each time you change computer it will automatically open the right file.
The following applies to those who want the flexibility of using a memory stick, but set its drive letter so that multiple computers will find the right data and open your own Family History file. These steps work for Windows Vista and Windows 7, 8 & 10, other operating systems may be different.
Instructions
If your memory stick is empty that is fine, but if you have already saved your ƒh Project file to the memory stick just make sure that ƒh is not running when you undertake these steps.
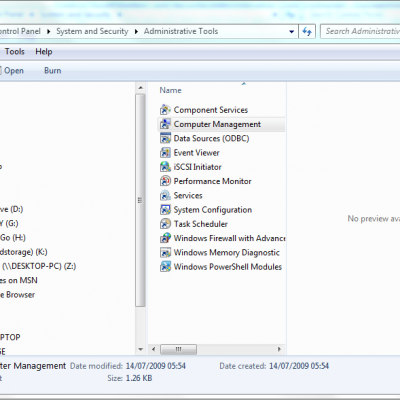
Click Start, click Control Panel, click System and Security or Search for Control Panel:

In System and Security click Administrative Tools:

In Administrative Tools click Computer Management. You may need to use right-click and Run as Administrator. If you have User Account Control you may get a message asking if you wish to continue; click Yes:
In Computer Management click Disk Management:
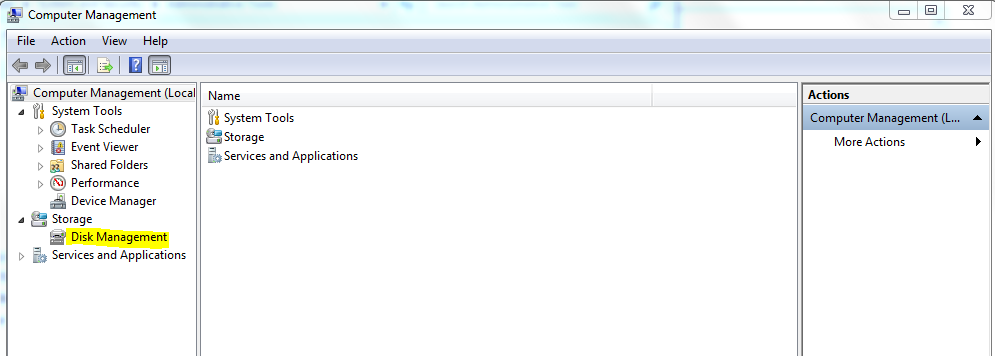
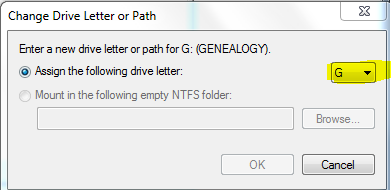
In Disk Management highlight the drive of your memory stick and right click. A pop up menu will appear and click Change drive letter and paths:

Click on the drive letter which opens a list for you to choose a new letter. In the example shown the drive letter has already been changed. Yours will probably show E or F. When you change the drive letter you will get a prompt asking you to confirm that you wish to proceed. It is perfectly safe to proceed if your memory stick is empty or contains only data files, including images. Preferably choose a letter high in the alphabet to avoid any fixed devices.
When you create your first Project or GEDCOM file and save it, the Project or GEDCOM file will be saved to your computer. You will need to locate the Project file (the whole Project folder including sub folders) and copy and paste it to the memory stick. Alternatively, use File > Project Window, select the Project, then clcik More Tasks > Copy Project and browse to the USB drive. If you use the GEDCOM method, the GEDCOM file and all the folders where you have linked media files should also be moved to the memory stick.
The first time you open ƒh after this exercise you will need to browse to the memory stick to find the Project or GEDCOM file. Then when the file is open in ƒh go to Tools > Preferences > Startup and make current file the Default Startup File. This will need to be done on both computers.
Alternatively, for Projects, change the File > Project Window > Location to refer to the folder on the USB drive.
This may sound complicated but it will only take about 10 minutes, which is time well spent as it will save a lot of hassle later.
Don’t worry if you are not confident to undertake this. It just means that you may have to browse to open the file when you change computers.
Synchronising Your Configuration and Other Data
Use the Backup and Restore Family Historian Settings plugin to synchronise settings and preferences.
To ensure Internet Data Matches are synchronised in ƒh V6 or later, then either use theBackup and Restore Family Historian Settings plugin to Restore Registry Data Keys, or use File > Import/Export > Export >User Credentials on main PC and File > Import/Export > Import > User Credentials on other PC to transfer the ƒh User Credentials.fhcrd file.
For advanced PC users, Synchronizing Family Historian Settings Using Directory Junctions provides a method for including individual Projects, or customised QueriesQuerying is a very powerful feature that allows you to specify and save criteria for identifying a set of records of a given record type., Text Schemes, or any other folders within the Dropbox/Google Drive/OneDrive folder.