If you are coming to Family Historian from another genealogy computer program you may want to start by reviewing Key Features for Newcomers and then the specific advice for migrating from your old program.
If you are new to Genealogy software welcome to a new fascinating aspect of your hobby – but it can also be frustrating. This article seeks to reduce the frustration and may also be useful for those who are so frustrated that they have decided to “start over” from scratch.
The process below is two stage:
- Quick Start. It invites you to enter some data – no more than say 20 people and preferably reaching back to the beginning of the 20th century – which for many countries means at least one set of censusCensus records are national collections of population statistics. They usually record details about members of a household on a particular date, and are typically collected every ten years. record is available to genealogists.
- Review. It then invites you to consider a number of issues about usage of ƒh before you have got too deeply stuck in. With only 20 people entered it is not the end of the world if you delete everything and start again.
Quick Start
 Calico PieCalico Pie Limited is a UK software house, and the publishers of Family Historian. have produced a Quick Start Guide on their website which gives a good overview of the basics.
Initially you can follow this looking at the Family Historian Example ProjectA Project is a Windows folder, created by Family Historian, which contains all your Family Tree information recorded in Family Historian. Normally located in the Documents\Family Historian Projects folder. that is installed with the Program (do not worry about “damaging it” – it is easily restorable Main Menu > File > Project Window , then More Tasks > Samples > Reset Sample Project).
Then you can follow the guide to enter a few people in your own project. Ideally start from something you know (like yourself) and move back through the generations entering parents, known grandparents, etc..
To create your own project start from the Project Window (Page 4 in the Quick Start Guide).
- Click on the New Project Button and then select “Start a new project (no import)” and click Next.
- Follow the prompts on the “Enter details for the Starting Person” dialogue; if in doubt put yourself as the starting person.
- Give the project a name in the “Enter Name for New Project” dialogue and click Finish which will take you to a (rather sparse) “Focus Window” in your project.
 You can then add other details of the “starting person”:
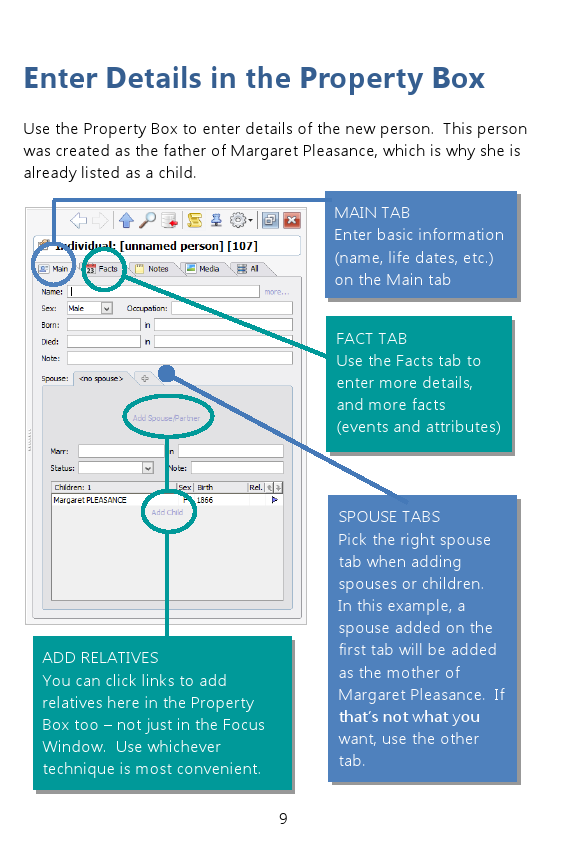
- Type any basic details in the property boxThe Property Box is the primary window for data entry and for viewing details of stored records. It is used with records of all types. on the right of the Focus WindowThe Focus Window is the primary workspace window. It displays information about a chosen person, called the 'Focus Person'. (Quick Start Guide page 9: Enter Details in the Property Box). If you want to add factsFacts are one of the key concepts at the heart of Family Historian; they are how you record the things that happened to, or described, each ancestor (Individual). beyond the basics on the Main Tab, go to the Facts tab and click on
 and complete the details that you have.
 - To add close relatives to someone, start at the Main tab of their property box and:
-
- For a spouse: click on “Add Spouse/Partner” in the spouse tab below the individual’s details.
- For children: click on “Add Child” in the dark grey area below spouse details.
When adding spouses or children you will be offered the choice of either “Create New Record” or “Link Existing Record” depending on whether the person concerned has already been added to the main file. - For parents: click on in the tool bar at the top and add either parent; if either parent already exists you will be taken straight to them.
You will also discover other ways to add people, such as clicking in areas of the Focus Window (Quick Start Guide Page 8). To enter an unrelated person in a new project select Main Menu > Add > unrelated Individual
Do not worry about being comprehensive at this stage and there is no need to add much more than “vital data” (where known: birth marriages and deaths and/or baptisms/burials) plus possibly a few other facts. Not all uncles, aunts and cousins etc. need to be added. The idea is to establish some data with which you can identify when reviewing your first entries.
Review
Many users find that they get deep into “doing their family tree” and then realise not that they have been “doing it wrong” but that it would be so much easier if they had done it differently!
From questions in the user forum and the mailing list, the following areas seem to be concepts where users often experience regret, even frustration and end up starting all over again, painstakingly working through hundreds or thousands of records and redoing them, or worse still, giving up.
Sources and Citations.
In making the quick start above you probably knew much of what you were entering because, well you just “knew”. But as you go deeper or share your research with others you find the need to be able to record (quite specifically), “How do I know that?” and “Where did I find that information?”. This is where sources and citations come in. They are easier to do as you go along that to retro-fit.
- A Source is “where you got the information”. A Citation is specifically “where within the source you found the information”.
- So if you got someone’s Christening DateWhen an Event happened, or an Attrribute was true. from “Great Great Grandma Smith’s Journal” – that is your source. The Citation would say which page of the journal your found that information, e.g. “7 December 1902”. The text being cited from the source might be “27 December 1902: Yesterday we attended the Christening of Florence’s latest. It was at Holy Trinity and she was named Clarabel Christine Constanza; I am one of the Godparents!“
- Alternatively if you got someone’s occuation from the birth certificateBirth Certificates are a formal record of the birth of a child, and typically include the date and place of birth together with information about the parents. of one of their children, the certificate is your source and since it is a single sheet the “where within the source” is pretty self evident and does not have to be specified.
- You will not be able to read many posts on the forum or mailing lists without coming up against the “splitter vs lumper issue”.
- In the example above “Great Great Grandma Smith’s Journal is a “lumped source” – the journal probably contains lots of different information – on different pages – “lumped” in the same physical artefact that will support lots of different facts.
- The birth certificate however is probably treated as split source – it is usually viewed as a distinct source rather than a certificate in some possibly imaginary “bound collection of certificates”.
- This issue is more complex when considering entering a Census Fact which has been found online. People differ as to what they consider to be the “Source”. Is it the “1911 Census of England and Wales” as found on Ancestry with the citation being the Archive Reference for the particular image, or is the source the specific Household Schedule (the lines of the actual piece of paper relating to your ancestor)? It is advisable to take a consistent approach to how you treat specific types of sources.
- How you decide to treat a specific type of source determines where you record things like transcriptions and the steps you may take to avoid needless duplication of input.
- Against source or citation records you can record in notesFamily Historian version 6 and below supports two types of Notes: Local notes (associated with a single person, record, or fact); and Note Records (sometimes called Shared Notes), that can be linked to multiple records and/or facts. Version 7 introduced your reasoning for concluding that the cited source does support the fact. For instance (see above) why you believe that Great Great Grandma Smith, when referring to Florence, was referring to her youngest aunt and not her sister?
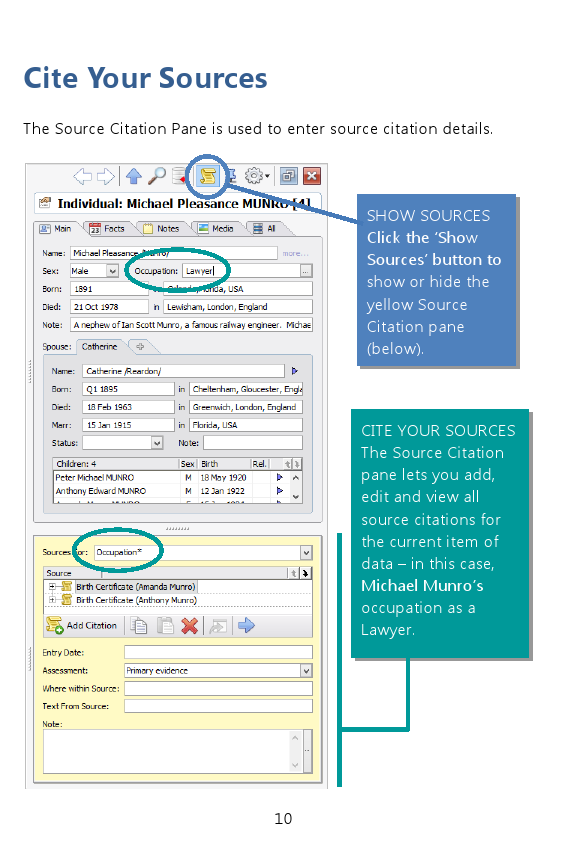 A Source is “where you got the information”. A Citation is specifically “where within the source you found the information”.
You may now want to review how you have treated any sources and citations in your small quick start project. You may want to experiment with entering a few sources and citations. You can read more about sources and citations in the Knowledge Base.
Places and Addresses.
Many facts are associated with a geographical location. Such locations are recorded in the Place and Address fields. Typically people may store the place, as in, New Town, Westshire, Ruritania in the Place field and the specific address 5, The High Street, in the address field. There are a number of considerations that might want to be, well, considered.
- If you want to use the Mapping Feature of ƒh you need to be aware that it uses the Place field but not the address field. If you want your map pins to end up on a specific address you need to put the address and the place details. 5, The High Street, New Town, Westshire, Ruritania into the Place field
- Even if your family is totally based in one Country, for mapping to work you need to add the name of the Country.
- There is a facility to “Standardise Place Names” which is useful when mapping. This means that if for instance a town was in a specific county at the time of a specific eventEvents are things that happened to an Individual and Attributes are things that described them. you can record it as happening in that town in that county (i.e as recorded on your source) even if the counties are later reorganised so that the town ended up in a different county. This facility is explained in more detail in the page placenames. Note that standardising a few towns is not that laborious; potentially standardising a significant number of combined addresses and places (see above) might be tedious.
You may now want to review how you have set up places and addresses in your small quick start project. You can read more about places and addresses and mapping in the Knowledge Base.
Media.
It is not necessary to include scans or photographs of those parts of sources that you are citing, but it does make it easier to review your work if you do. You can also get pictures of your ancestors and places where they lived or worked to appear in Family Tree Diagrams or Reports if you do. When adding media it is important to realise:
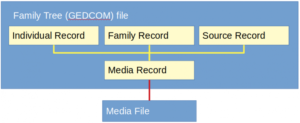
- Media files are held separately on your computer to the family tree file. Within the family tree file (also called the GEDCOMGEDCOM, an acronym for GEnealogical Data COMmunication, is a specification for exchanging genealogical data between different genealogy software. It is a file format that most genealogical programs and online trees recognise. file) there are media records which are like index cards for the media files. Media Files and Media Records are two different things! Within ƒh when you “add media” to a record, a source, a citation or a fact, you are either linking an existing media recordWhen you add a picture, video, sound recording, document file etc into a Family Historian project, a Media record is created to represent that media item within the project; the Media record includes a link to the actual Media file. to the fact etc. or you are creating a new media record to which a media file is attached and the media record is then linked to the fact etc.
- Media can be added in a number of places within ƒh:
- If it is a portrait of a person, you can add it to that person’s media tab in their property box by clicking the green add media icon .
- If the media supports or illustrates a fact, you can attach it to the fact by clicking the add media icon in the tool bar below the fact window on the Fact tab, but
- If the media is actually supporting the source or citation that supports or illustrates the fact you can attach the media to the source or citation through clicking the add media icon on the Yellow Citations part of the property box. (In the subsequent dialogue selected “Citation Media” for lumped sources and “Source RecordSource: "where information was found". This could be anything from an archive in a county records office, a book, or even a relative's recorded recollection. Citing your Sources helps to show how you reached a particular conclusion about an Individual. Media” for split sources – see discussion above.) This distinction can be important if a fact is supported by more than one source; which source is the media actually of? If you have attached the media to the fact and then added another source you have created the opportunity for later confusion.
- If it is a portrait of a person, you can add it to that person’s media tab in their property box by clicking the green add media icon
- Life is a lot easier if your media files are kept within the ƒh Project file system. ƒh when it creates a new Project (see the Project Window Page 4 in the Quick Start Guide) sets up a new folder for the Project and within this structure there is a Media subfolder (within the .fh_data subdirectory). By default, when you add medai, ƒh will offer to copy the media into this subfolder. Accepting this option means that links between your media records and your media files are less likely to get broken, are more easily repaired if they are broken and your media files will get backed up together with your GEDCOM file.
 Media can be added in a number of places within
 You may now want to review how you have handled media in your small quick start project or to try adding some media (either a portrait added to an Individual’s Media Tab or a Census or Certificate Image added to the source/citation for the relevant fact). You can read more about Media in the Knowledge Base.
Projects and Backup / Restore
By Default ƒh sets up each Family Tree (GEDCOM) file up in its own project.
- Most users will only have one project. You can keep multiple disconnected family trees in the same family tree (GEDCOM) file. This means that if you later discover two families are related it is easy to connect them because they are in the same file.
- The project file structure is designed to ensure easy backups. You can back up either through the Main Menu > File > Backup/Restore menu sequence or by following the prompt when exiting ƒh.
- Note that backups are stored in a zip file. You should use the Main Menu > File > Backup/Restore menu sequence within ƒh when restoring; do not attempt to access this file from outside ƒh when trying to restore.
- Backups can backup different levels. Accepting a full back up will mean that all your work including media and saved family tree charts will get saved with the GEDCOM file into the backup zip file.
- Backups should ideally not be to the same hard drive as your actual project. Lose the project hard drive and you have lost the backup as well. Use Main Menu > File > Backup/Restore > Backup Options… to set the location of your backup files.
You may now want to review your backup options and experiment with taking a backup of your small quick start project and checking that you can recover it. You can read more about Projects and Backups in the Knowledge Base.
Conclusion
Once you have worked through these review steps and considered your options you can either dive in and continue or “start over” knowing that you have not entered masses of data. Or you may wish to experiment with other options and Diagrams or Reports before you enter more data.