Introduction
The tutorials for entering factsFacts are one of the key concepts at the heart of Family Historian; they are how you record the things that happened to, or described, each ancestor (Individual). all focus on the default installation templates of Ancestral SourcesAncestral Sources is a utility written by Nick Walker, designed to be used in conjunction with Family Historian to allow faster, more convenient creation of Census, Birth, Baptism, Marriage, Death and Burial/Cremation records. , which for many users will be fine, but the templates offer ways to customise how certain features work. All the Options, Templates, and Tools settings apply equally to all Projects, but they can be different in each Windows User Account.
They are based on very old versions of Ancestral Sources and Family Historian, so do not include some of the features that are now available such as templated sourcesFamily Historian Version 7 introduced the ability to define sources using 'Source Templates' to aid precision and consistency in entering source-identifying information. and rich-text. Videos that refer to those new features are available on the Ancestral Sources Videos page. However, the fundamental concepts are still reasonably relevant.
Some of the features of customising or creating templates are intended for more advanced users, but even beginners should be aware of the fundamental capabilities.
Throughout the tutorials the notation ‘Option1 > Option2 > Option3 button’ means select menubar Option1, then Option2, and finally click the Option3 button.
It is feasible to copy & paste many of the data values from the tutorial scripts directly into Ancestral Sources input forms.
Before you start, please Configure Initial Settings.
Concepts, Keywords and Functions
Ancestral Sources allows many of its features to be customised with templates that change the way data is presented in a convenient and consistent manner.
Remember to use Help to obtain extra advice, and hover the mouse over buttons and boxes to obtain a brief Tooltip.
Concepts
Most of the templates use Keywords, such as {DATE} and {ADDR}, that represent current values entered while capturing the event data. For example, {DATE} represents the DateWhen an Event happened, or an Attrribute was true. of the event, while {ADDR} represents the Address"The address structure should be formed as it would appear on a mailing label…", according to GEDCOM; however, this is capable of a number of interpretations, and Address and Place are best considered together. where the event took placeAccording to GEDCOM, a Place should hold "The jurisdictional name of the place where the event took place…" . This is very similar to the way Family Historian defines a Fact Sentence using Template Codes.
Some templates support Functions that allow values to be managed. For example, =UPPER[{ADDR}] coverts the Address to uppercase, and =IF[{ADDR}|{ADDR}|<Not Recorded>] yields the Address if it exists, otherwise <Not Recorded>. These are similar to Functions in Family Historian and are intended for advanced users.
Other templates use a variety of options and parameters to define their behaviour and are intended for advanced users. See Associated Individual Types and Census Grid Templates for details.
Keywords
Keywords Tutorial
-
Open Ancestral Sources and ensure the Family Historian Sample Project or the Sample.ged file opens by default, but if not then Configure Initial Settings
-
Ensure that the Census Records mode is active by clicking the Create census entries button near the middle of the toolbar, or by choosing View > Census Editor
-
Use the menubar option Tools > Autotext Template Editor… and in the Title: box enter Tutorial
-
Click the < Keyword button and choose {SOURCETYPE} from the bottom of the list
-
Type in a space then in and another space, then use < Keyword and choose {COUNTRY}
-
Now the template should look like {SOURCETYPE} in {COUNTRY}
-
Note that the Preview shows Census in UK
-
Click the Save button and then the Close button
-
From the Census Country: dropdown list choose Canada
-
Use the menubar option Tools > Autotext Template Editor… again
-
From the Template: dropdown list choose Tutorial that was saved above
-
Note that the Preview now automatically shows Census in Canada instead of UK
-
Click the Delete button, click OK to the warning, and click the Close button
-
Close Ancestral Sources
Keywords Reference
This table lists a Keyword, an Example representation, and an Explanation of its value. A different set of these Keywords is available in each type of template as explained below.
| Keyword | Example | Explanation |
|---|---|---|
| {YEAR} | 1891 | Year that the event took place |
| {COUNTRY} | UK | Census country (Census only) |
| {DATE} | 3 September 1800 | Date that the event being recorded took place |
| {DATE.DAY} | 3 | Day of the date |
| {DATE.DAY2} | 03 | Day of the date as 2 digits |
| {DATE.MONTH.NUM} | 9 | Month of the date in numeric format |
| {DATE.MONTH.NUM2} | 09 | Month of the date in numeric format as 2 digits |
| {DATE.MONTH.SHORT} | Sep | Month of the date in short format |
| {DATE.MONTH.SHORT.CAPS} | SEP | Month of the date in short format and capitals |
| {DATE.MONTH.FULL} | September | Month of the date in full format |
| {DATE.MONTH.FULL.CAPS} | SEPTEMBER | Month of the date in full format and capitals |
| {PLACE} | Warrington, Lancashire, UK | Place where the event took place |
| {PLACE.SHORT} | Warrington | First part of the place up to the first comma |
| {ADDR} | The Rectory, Main Street | Address where the event took place |
| {ADDR.SHORT} | The Rectory | First part of the address up to the first comma |
| {OTHER} | Anything | The data entered into the Other Info field |
| {REF} | HO107 1234 56 78 | The data entered into the Ref ID field |
| {KEYPERSON} | Alan Jones | Name of key person i.e. Head in Census, person being baptised, groom, etc. |
| {KEYPERSON…} | See Keywords Sub-tags below | |
| {SPOUSE} | Alice Jane Smith | Name of person marrying {KEYPERSON} (Marriage only) |
| {SPOUSE…} | See Keywords Sub-tags below | |
| {KEYFATHER} | John Jones | Name of father of {KEYPERSON} (non-Census Auto Text Templates only) |
| {KEYFATHER…} | See Keywords Sub-tags below | |
| {KEYMOTHER} | Janet Jones | Name of mother of {KEYPERSON} (non-Census Auto Text Templates only) |
| {KEYMOTHER…} | See Keywords Sub-tags below | |
| {SPOUSEFATHER} | John Smith | Name of father of {SPOUSE} (Marriage Auto Text Templates only) |
| {SPOUSEFATHER…} | See Keywords Sub-tags below | |
| {SPOUSEMOTHER} | Janet Smith | Name of mother of {SPOUSE} (Marriage Auto Text Templates only) |
| {SPOUSEMOTHER…} | See Keywords Sub-tags below | |
| {ASSOCPERSON} | Jack Jones | Name of associated person (Associated Individual Types Templates only) |
| {ASSOCPERSON…} | See Keywords Sub-tags below | |
| {ASSOCLIST.COMMA} | Jack Jones, Tom Buck | List of associated people separated by commas |
| {ASSOCLIST.COMMA.AND} | Jack Jones and Tom Buck | List of associated people separated by commas but with and before last one |
| {ASSOCLIST.COMMACR | Jack Jones, Tom Buck |
List of associated people separated by commas and carriage returns |
| {MINISTER} | Rev Ian James | Name of minister entered in parish records (e.g. priest or vicar) |
| {SOURCETYPE} | Census | Either Census or Baptism or Christening or Marriage |
| {MARRIAGETYPE} | By Banns | Either After Banns or By Banns or By Certificate or By Licence (Marriage only) |
| {CENSUSGRID} | Columns of text from census grid (Census Auto Text Templates only) | |
| {SYSTEM.VERSION} | 3.0.0 | Current version of Ancestral Sources |
| {SYSTEM.DATE} | 12 Mar 2012 | Today’s date |
| {SYSTEM.TRANSCRIBER} | Mike | Name of Transcriber from Options ~ General Settings |
Source Title and Type Templates
These small templates allow certain titles and names to be customised. All users should be conversant with them such that a consistent naming strategy can be devised.
Remember to use Help to obtain extra advice, and hover the mouse over buttons and boxes to obtain a brief Tooltip.
Source Title Template Field
These options allow each Source Record Title to be dynamically customised, primarily for Method 1 source data entries for ‘source splitters’.
- If necessary, open Ancestral Sources
- Use Tools > Options > Census settings – method 1 and note the Example shown below the template.
- Delete the keywords {PLACE} and ({OTHER}) and note how the Example changes.
- Click on the << button and choose {KEYPERSON.SN_GN.CAPS} from the dropdown list.
- Use Tools > Options > Baptism settings – method 1 and note the Example shown below the template.
- Delete the entire template.
- Click on the << button and choose the keywords {KEYPERSON.SN_GN.CAPS} and {YEAR} and {SOURCETYPE} in turn.
- Ensure a space is entered between each item.
- Use Tools > Options > Marriage settings – method 1 and note the Example shown below the template.
- Delete the entire template.
- Click on the << button and choose the keywords {KEYPERSON.SN_GN.CAPS} and {SPOUSE.SN_GN.CAPS} and {YEAR} and {SOURCETYPE} in turn.
- Insert an ampersand & between the key person & spouse, and ensure a space is between each item.
Note how each Example shows the key person name in the same style as Family Historian uses in the Individual Records window when Installation Settings apply. Other Keywords Sub-tags may be better for other settings.
Source recordsSource: "where information was found". This could be anything from an archive in a county records office, a book, or even a relative's recorded recollection. Citing your Sources helps to show how you reached a particular conclusion about an Individual. named in this way can sort individuals together, with their eventsEvents are things that happened to an Individual and Attributes are things that described them. in date order.
Image Title Template Field
These options allow each MultimediaWhen you add a picture, video, sound recording, document file etc into a Family Historian project, a Media record is created to represent that media item within the project; the Media record includes a link to the actual Media file. Record Title to be dynamically customised for linked image entries.
- If necessary, open Ancestral Sources
- Use Tools > Options > Census settings and experiment with the Census Image Title Template in a similar way to the templates above.
- Use Tools > Options > Baptism settings and experiment with the Baptism Image Title Template in a similar way to the templates above.
- Use Tools > Options > Marriage settings and experiment with the Marriage Image Title Template in a similar way to the templates above.
The date keywords {YEAR}-{DATE.MONTH.NUM2}-{DATE.DAY2} can be combined to create a title component such as 1851-03-30 that allows records to be sorted in date order.
Source Type Field
- If necessary, open Ancestral Sources
- Use Tools > Options > Baptism settings and hover the mouse over the Source Type box to obtain its tooltip.
- This tooltip explains that the keyword {SOURCETYPE} is supported, and will be replaced by Baptism or Christening depending on the setting of the Use christening fact instead option below.
- Click Cancel and close Ancestral Sources
Auto Text Templates
Most users should consider editing existing, or creating new, Auto Text Templates to customise transcripts of the source data entries.
There is also a growing number of templates in the Downloads ~ (Templates) Ancestral Sources.
Remember to use Help to obtain extra advice, and hover the mouse over buttons and boxes to obtain a brief Tooltip.
Auto Text Template Editor
These templates allow the Family Historian Text From Source field to hold a customised transcript of the source data. When the Auto button is used on the main screen, the Text field is composed from the selected template. This may be further edited as necessary before the entry is saved to Family Historian.
If any Text From Source field appears in a Family Historian Report then it usually follows on the same line as the header, unless it starts with a blank line. So it is recommended that all Auto Text Templates start with a blank line.
For more advice on how to format a Text From Source field and obtain a tidy presentation in both Source Records and printed Reports, see how to Tabulate Multiline Text in Records and Reports.
Census Auto Text Tutorial
This tutorial demonstrates how to create a simple generic Census transcript template.
- Open Ancestral Sources and ensure the Family Historian Sample ProjectA Project is a Windows folder, created by Family Historian, which contains all your Family Tree information recorded in Family Historian. Normally located in the Documents\Family Historian Projects folder. opens by default, but if not then Configure Initial Settings
- Ensure that the Census RecordsCensus records are national collections of population statistics. They usually record details about members of a household on a particular date, and are typically collected every ten years. mode is active by clicking the Create census entries button near the middle of the toolbar, or by choosing View > Census Editor
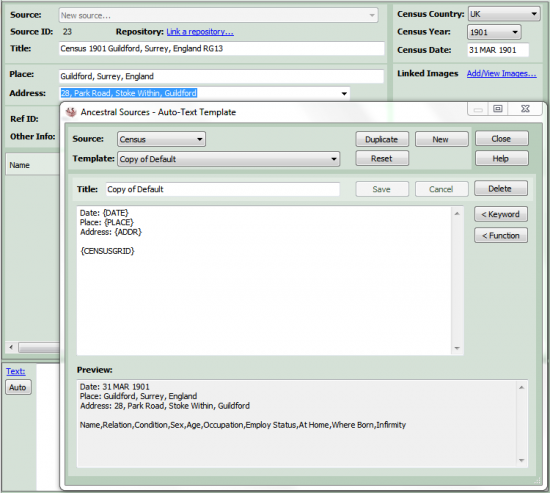
- Set Census Year: = 1901 and Place: = Guildford and Address: = 28 Park Road, which may auto-complete
- Use the menubar option Tools > Autotext Template Editor…
- Ensure Source: is set to Census and select the Template: named Default
- Click the Duplicate button to create a template with Title: = Copy of Default
- Note that the {CENSUSGRID} keyword produces the grid headings in the Preview: and when the grid is populated with the household it will list the household details
- Place the cursor next to {CENSUSGRID}, press the Home key and Enter key, then hold Ctrl and press Home key
- Type in Date: and a space, then from < Keyword select {DATE}, and press Enter
- Type in Place: and a space, then from < Keyword select {PLACE}, and press Enter
- Type in Address: and a space, then from < Keyword select {ADDR}, and press Enter
Notice that the Preview: illustrates how the transcript will finally appear - Click the Save button to preserve the template and then click the Close button
- Now click the Auto button near the Text field and choose Copy of Default
- The ticked Auto option below, means that the Text transcript will automatically update as data changes
- So alter the Census Year: to 1911 and note how both the Date and the grid Headings change in both the main screen and the transcript
See the Ancestral Sources Template ~ Census Auto-Text Downloads for templates that you can Copy & Paste into the editor.
The Enter Census Facts tutorial illustrates how an Auto Text transcript is included in a Census data entry.
Baptism Auto Text Tutorial
This tutorial demonstrates similar capabilities for Baptism transcript templates.
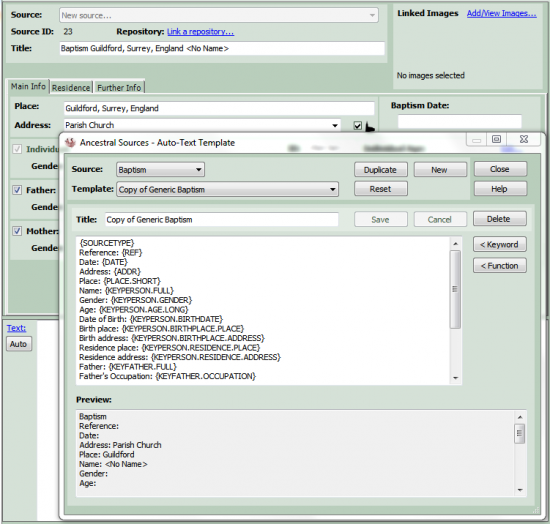
- If necessary, open Ancestral Sources and ensure the Family Historian Sample Project opens by default, but if not then Configure Initial Settings
- Ensure that the Baptism RecordsBaptism details are recorded in the registers of churches and chapels whenever a person, usually a child, is baptised or christened. They usually include information about the parents, and sometimes god-parents, and the date of birth of the child. mode is active by clicking the Create baptism entries button near the middle of the toolbar, or by choosing View > Baptism Editor
- Set Place: = Guildford and Address: = Parish Church, which may auto-complete
- Use the menubar option Tools > Autotext Template Editor…
- Ensure Source: is set to Baptism and select the Template: named Generic Baptism
- Click the Duplicate button to create a template with Title: = Copy of Generic Baptism
- Notice that the Preview: illustrates how the transcript will finally appear
- Click the Save button to preserve the template and then click the Close button
- Now click the Auto button near the Text field and choose Copy of Generic Baptism
- The ticked Auto option below, means that the Text field will automatically update as data changes
- Experiment with entering data and note how the transcript changes
- Use menubar option Tools > Autotext Template Editor… again, and select the Template: named Copy of Generic Baptism
Experiment with editing the template, Save it and click Auto to see the resulting transcript - Close Ancestral Sources and OK any warning messages
See the Ancestral Sources Template ~ Baptism Auto-Text downloads for templates that you can Copy & Paste into the editor.
The Enter Baptism Facts tutorial illustrates how an Auto Text transcript is included in a Baptism data entry.
Marriage Auto Text
This tutorial demonstrates similar capabilities for Marriage transcript templates.
- If necessary, open Ancestral Sources and ensure the Family Historian Sample Project opens by default, but if not then Configure Initial Settings
- Ensure that the Marriage Records mode is active by clicking the Create marriage entries button near the middle of the toolbar, or by choosing View > Marriage Editor
- Set Place: = Newton and Address: = Parish Church, which may auto-complete
- Use the menubar option Tools > Autotext Template Editor…
- Ensure Source: is set to Marriage and select the Template: named Generic Marriage
- Click the Duplicate button to create a template with Title: = Copy of Generic Marriage
- Notice that the Preview: illustrates how the transcript will finally appear
- Click the Save button to preserve the template and then click the Close button
- Now click the Auto button near the Text field and choose Copy of Generic Marriage
- The ticked Auto option below, means that the Text field will automatically update as data changes
- Experiment with entering data and note how the transcript changes
- Use menubar option Tools > Autotext Template Editor… again, and select the Template: named Copy of Generic Marriage
- Experiment with editing the template, Save it and click Auto to see the resulting transcript
- Close Ancestral Sources and OK any warning messages
The Enter Marriage Facts tutorial illustrates how an Auto Text transcript is included in a Marriage data entry.
Associated Individual Types
These templates are for more advanced users needing to record how any person is linked to the event being entered, other than as a family relation. The most obvious examples are godparents or witnessesA Witness is somebody who played an important role in an event (or rarely, attribute) but were not a Principal, e.g. they could have been a bridesmaid at a wedding, rather than one of the individuals getting married. at baptisms and weddings.
Remember to use Help to obtain extra advice, and hover the mouse over buttons and boxes to obtain a brief Tooltip.
Associated Individual Types Editor
The following tutorials demonstrate the template editor for Baptism events.
Getting Started Tutorial
- If necessary, open Ancestral Sources and ensure the Family Historian Sample Project opens by default, but if not then Configure Initial Settings
- Ensure that the Baptism Records mode is active by clicking the Create baptism entries button near the middle of the toolbar, or by choosing View > Baptism Editor
- Select the Main Info tab so that the key person for the baptism can be entered
- Double-click Anderson, Iain from the list of Individual names top right, and chose Individual
- Notice that the source Title: above becomes Baptism Iain Anderson
- Select the Further Info tab so that associated individuals can be entered
- From the Associations: drop-down list choose Godparents
- Double-click Addison, Helen Mary from the list of Individual names top right
- Notice how the Name: and Desc: fields are automatically updated
- If this entry were Saved:
- The Baptism Event for Iain Anderson would gain a local Note
- It would say God-parent: Helen Mary Addison derived from the Desc: field
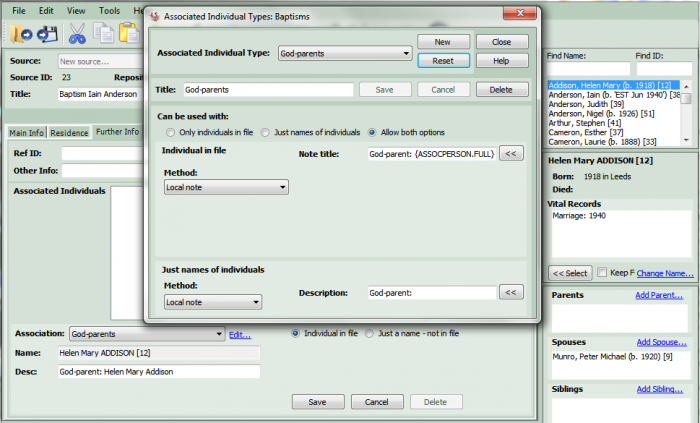
- Open the template editor by clicking the Edit… link to the right of the Association: field
- From the Associated Individual Type: drop-down list choose God-parents to see how the template is defined
- The Can be used with: option supports three modes:
- Only individuals in file requires an Individual in your database to be chosen
- Just names of individuals requires a name to be typed in
- Allow both options is the default and allows either of the above
- The Individual in file methods fall into five categories:
- Witness Role where an Individual is a Witness to a Fact (FH V6 only)
- Associations where the GEDCOMGEDCOM, an acronym for GEnealogical Data COMmunication, is a specification for exchanging genealogical data between different genealogy software. It is a file format that most genealogical programs and online trees recognise. association structure ASSO tag is used
- Custom Facts where a Fact is added to the associated Individual
- Notes where text is added to a Note field or record
- Not recorded where the association only appears in transcripts from Auto Text Templates
- The Just names of individuals methods are:
- Witness Role where a named person is a Witness to a Fact (FH V6 only)
- Local Note where text is added to a Note field
- Not recorded where the association only appears in transcripts from Auto Text Templates
- After examining these options and the Help, click the Cancel button (if it is enabled) and OK the warning
- The Reset button can be used to reinstate the installation default templates
- Click the Close button to close the editor
In File Associations Tutorial
- If the main screen Title: is not Baptism Iain Anderson, then re-enter this key person
- Open the template editor again by clicking the Edit… link to the right of the Association: field
- Click the New button and enter the Title: of the new association as Nanny (i.e. children’s nurse)
- From the Method: drop-down list choose Association struct. – both ways
- In Relation from Individual: enter Nanny
- In Relation from Associated: enter Ward
- In Local note: select {ASSOCPERSON} from << button, type in was Nanny to , and select {KEYPERSON} from << button
- Click the Save button and the Close button
- From the Associations: drop-down list choose Nanny and double-click Addison, Helen Mary as before
- If this were Saved:
- Iain Anderson would gain an Association to Helen Mary Addison with relationship Nanny
- Helen Mary Addison would gain an Association to Iain Anderson with relationship Ward
- Both would have a local Note saying Helen Mary Addison was Nanny to Iain Anderson
- If the Method chosen had been Association structure, then only the first association would be entered
Our Downloads offers a Property Box Tab ~ Associated Persons customisation that lists and navigates Associations.
You may follow or skip any of the following tutorials as you prefer, providing you perform the Final Delete and Close section.
In File Custom Fact Tutorial
- If the main screen Title: is not Baptism Iain Anderson, then re-enter this key person
- Open the template editor again by clicking the Edit… link to the right of the Association: field
- From the Associated Individual Type: drop-down list choose Nanny
- From the Method: drop-down list choose Custom Event (noting that Custom AttributeUsers of Family Historian can customize fact definitions, or create their own fact definitions to more closely match they way they want to work. is also available)
- The Event: name is Nanny, and is the name of the Family Historian custom Event to be created
- The Local note: is {ASSOCPERSON} was Nanny to {KEYPERSON}
- Click the Save button and the Close button
- From the Associations: drop-down list choose Nanny and double-click Addison, Helen Mary as before
- If this were Saved:
- Helen Mary Addison would gain a Nanny custom Event
- Its local Note would say Helen Mary Addison was Nanny to Iain Anderson
This Nanny custom Event is acceptable to Family Historian, but its default Fact Sentence will say something like She experienced Nanny on 1 Jan 2000 in Newton, Surrey. This can be improved by creating a new Custom Event within Family Historian using Tools > Work with Fact Sets… and defining a Sentence TemplateSentences are used in conjunction with Fact Sets to produce Narrative Reports; their templates are highly customisable.. In this example the name of the Custom Event must be Nanny.
Conversely, if you already have a suitable Custom Event/Attribute in Family Historian, then ensure the Event:/Attribute: name matches exactly, and for a Custom Attribute the Value: field is appropriate.
In File Linked Note Tutorial
- If the main screen Title: is not Baptism Iain Anderson, then re-enter this key person
- Open the template editor again by clicking the Edit… link to the right of the Association: field
- From the Associated Individual Type: drop-down list choose Nanny
- From the Method: drop-down list choose Linked Notes
- The Linked note: is {ASSOCPERSON} was Nanny to {KEYPERSON}
- Click the Save button and the Close button
- From the Associations: drop-down list choose Nanny and double-click Addison, Helen Mary as before
- If this were Saved:
- The Helen Mary Addison whole person record would gain a Linked Note
- The Baptism Event for Iain Anderson would gain the same Linked Note
- The Linked Note record would say Helen Mary Addison was Nanny to Iain Anderson
In File Local Note Tutorial
- If the main screen Title: is not Baptism Iain Anderson, then re-enter this key person
- Open the template editor again by clicking the Edit… link to the right of the Association: field
- From the Associated Individual Type: drop-down list choose Nanny
- From the Method: drop-down list choose Local note
- In the Note title: field ensure Nanny is suffixed with {ASSOCPERSON} from << button
- Click the Save button and the Close button
- From the Associations: drop-down list choose Nanny and double-click Addison, Helen Mary as before
- If this were Saved:
- The Baptism Event for Iain Anderson would gain a local Note saying Nanny Helen Mary Addison
In File Not Recorded Tutorial
- Open the template editor again by clicking the Edit… link to the right of the Association: field
- From the Associated Individual Type: drop-down list choose Nanny
- From the Method: drop-down list choose Not recorded
- Click the Save button and the Close button
- From the Associations: drop-down list choose Nanny and double-click Addison, Helen Mary as before
- If this were Saved:
- Helen Mary Addison would not appear anywhere unless one of the {ASSOCLIST} keywords is used in the Auto Text transcript
Just Names Local Note Tutorial
- If the main screen Title: is not Baptism Iain Anderson, then re-enter this key person
- Open the template editor again by clicking the Edit… link to the right of the Association: field
- From the Associated Individual Type: drop-down list choose Nanny
- Under Just names of individuals: in its Method: drop-down list choose Local note
- In Description: enter Nanny:
- Click the Save button and the Close button
- From the Associations: drop-down list choose Nanny and select Just a name – not in file
- In the Name: field enter McPhee
- If this were Saved:
- The Baptism Event for Iain Anderson would gain a local Note saying Nanny: McPhee
Just Names Not Recorded Tutorial
- Open the template editor again by clicking the Edit… link to the right of the Association: field
- From the Associated Individual Type: drop-down list choose Nanny
- Under Just names of individuals: in its Method: drop-down list choose Not recorded
- Click the Save button and the Close button
- From the Associations: drop-down list choose Nanny and select Just a name – not in file
- In the Name: field enter McPhee
- If this were Saved:
- McPhee would not appear anywhere unless one of the {ASSOCLIST} keywords is used in the Auto Text transcript
Final Delete and Close
- If the main screen Title: is not Baptism Iain Anderson, then re-enter this key person
- Open the template editor again by clicking the Edit… link to the right of the Association: field
- From the Associated Individual Type: drop-down list choose Nanny
- Experiment with editing the template
- When finished, click the Delete button and the Close button
- Close Ancestral Sources and OK any warning messages
The Enter Baptism Facts tutorial illustrates how an Associated Individual is included in a Baptism data entry.
The Enter Marriage Facts tutorial illustrates how an Associated Individual is included in a Marriage data entry.
Census Grid Templates
These templates are for the most advanced users needing to modify or create Custom Census Grids for Countries or Years not included with Ancestral Sources.
There are some extra Census Grid templates in the Downloads and Links ~ Ancestral Sources library that may be imported.
Remember to use Help to obtain extra advice, and hover the mouse over buttons and boxes to obtain a brief Tooltip.
Census Grid Template Editor
- If necessary, open Ancestral Sources and ensure the Family Historian Sample Project opens by default, but if not then Configure Initial Settings
- Ensure that the Census Records mode is active by clicking the Create census entries button near the middle of the toolbar, or by choosing View > Census Editor
- Use the menubar command Census > Census Templates…
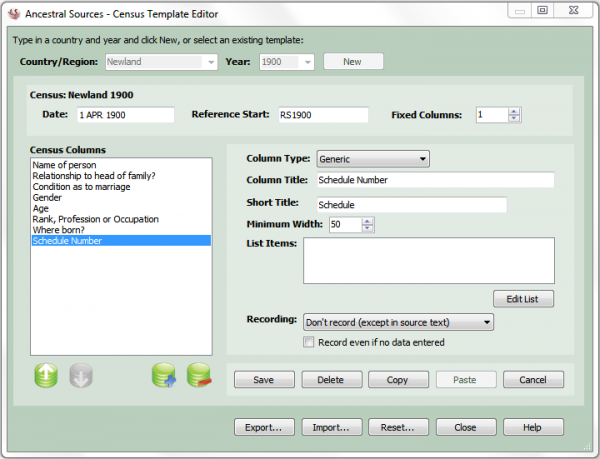
- In Country/Region enter Newland, in Year enter 1900, then click the New button
- In Date enter 1 Apr 1900, in Reference Start enter RS1900, in Fixed Columns enter 1
- Click +Add new column button and select Column Type of Name
- Click +Add new column button and select Column Type of Relationship, set Short Title to Relationship and click Set Default
- Click +Add new column button and select Column Type of MarriageCondition, set Short Title to Condition and click Set Default
- Click +Add new column button and select Column Type of Gender, set Short Title to Sex and click Set Default
- Click +Add new column button and select Column Type of Age
- Click +Add new column button and select Column Type of OccupationAn occupation is defined in the GEDCOM standard as: ‘The kind of activity that an individual does for a job, profession, or principal activity’., and set Short Title to Occupation
- Click +Add new column button and select Column Type of PlaceOfBirth, and set Short Title to Birthplace
- Click +Add new column button and select Column Type of Generic for a custom column
- In Column Title enter Schedule Number and set Short Title to Schedule
- Reduce Minimum Width to 40
- Experiment with adding other columns or using up/down arrows to change their order
- When satisfied, click the Save button and then the Close button
- On the main screen select Census Country of Newland and Census Year of 1900
- Note how the Census Date, Ref ID, and Column Titles appear
- Experiment populating the grid and when finished clear the grid and set Census Country to UK
- Use the menubar command Census > Census Templates… again
- Set Country/Region to Newland and Year to 1900
- If creating a series of Census Years with similar Columns then Copy and Paste will help
- The Export button exports the template in its own file for distributing to other users
- Click the Delete button to remove this tutorial template, OK the warning, and click Close
- Close Ancestral Sources
Once you’ve finished this tutorial, remember to Restore Original Settings.