Introduction
The tutorials for entering facts all focus on the default installation settings of Ancestral SourcesAncestral Sources is a utility written by Nick Walker, designed to be used in conjunction with Family Historian to allow faster, more convenient creation of Census, Birth, Baptism, Marriage, Death and Burial/Cremation records. , which for many users will be fine, but there are numerous options that allow you to customise how things work. All the Options, Templates, and Tools settings apply equally to all Projects, but they can be different in each Windows User Account.
They are based on very old versions of Ancestral Sources and Family Historian, so do not include some of the features that are now available such as templated sourcesFamily Historian Version 7 introduced the ability to define sources using 'Source Templates' to aid precision and consistency in entering source-identifying information. and rich-text. Videos that refer to those new features are available on the Ancestral Sources Videos page. However, the fundamental concepts are still reasonably relevant.
The options highlighted with ** are important to get correct from the outset, otherwise your GEDCOMGEDCOM, an acronym for GEnealogical Data COMmunication, is a specification for exchanging genealogical data between different genealogy software. It is a file format that most genealogical programs and online trees recognise. database will need a great deal of subsequent editing.
Remember to use Help to obtain extra advice, and hover the mouse over buttons and boxes to obtain a brief Tooltip.
Throughout the tutorials the notation ‘Option1 > Option2 > Option3 button’ means select menubar Option1, then Option2, and finally click the Option3 button.
It is feasible to copy & paste many of the data values from the tutorial scripts directly into Ancestral Sources input forms.
Before you start the tutorial, please Configure Initial Settings.
General Settings
Most of these options customise the user interface, but a few adjust global interactions with Family Historian. They apply to all Source Types handled by Ancestral Sources.
Newcomers in particular are recommended to work with the default installation settings, until sufficient experience is gained to make an informed choice.
Remember to use Help to obtain extra advice, and hover the mouse over buttons and boxes to obtain a brief Tooltip.
User Interface Options
Use Tools > Options to open the Options window and ensure General settings is selected.
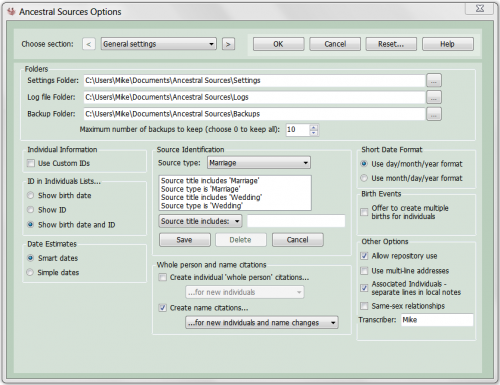
Folders
The Folders options allow the location of administration files to be specified. They should not be changed, unless you need to move them to another disk drive, or into a Dropbox folder, or similar Synchronisation & Backup folder. Use the Help button to obtain more details.
Every time changes are saved to the GEDCOM file a backup copy is saved, and by default only the most recent 10 backups are retained. This number can be changed, and if set to 0 then all backups are retained.
Individual Information
Usually the [Record ID] is used to identify individuals, but ticking Use Custom IDs will substitute the <Custom ID> if it exists, and allow it to be specified when adding new Individuals.
ID in Individuals List
These options specify how individuals are identified in lists on the main screen. You can opt to Show birth date, Show ID, or Show birth date and ID. If a Birth Date does not exist, then the ID will be substituted.
Date Estimates
This determines how, for example, a Birth Year is estimated from a known Date and Age.
Select Simple dates and the Age is simply subtracted from the Date Year.
e.g. A person who is 10 years of age in February 1880 is estimated to be born in 1870.
Select Smart dates and if the Date falls before the end of June, then 1 extra year is subtracted.
e.g. A person who is 10 years of age in February 1880 is estimated to be born in 1869, which is more probable.
Source Identification
This specifies how to recognise sources in the GEDCOM file as being a particular Source Type. This is principally used with Recording Method 2 as discussed in Census Settings and Baptism Settings and Marriage Settings below, but also when you Add Images to Sources Most users should find that the default filter settings do not need to be changed.
Filter Demonstration
Close the Options window by clicking Cancel, use View > Add Images to Existing Sources, then from the Type: drop-down list select Census, and note the Source: list is empty.
Use Tools > Options and from the Source type: list select Census, and ensure Source title includes: is selected, then enter the letter a in the box and click Save. This adds an extra filter that will recognise any Source Record with an a in its Title as being a Census.
Close the Options window by clicking OK, use View > Add Images to Existing Sources, then from the Type: drop-down list select Census again, and note the Source: list now includes several Source Records all with a in their Title.
Reset Button
Click the Reset… button and from the Choose the settings to be reset: list select Reset census settings only and click OK. Notice that the Census filter list modified above has been reset.
Short Date Format
When entering a date such as 5/10/1800 it could be interpreted as 5th October 1800 with Use day/month/year format or 10th May 1800 with Use month/day/year format. The default is automatically determined from the Windows control panel settings. However, you can choose to change this if necessary.
Birth Events
Most users prefer a single Birth Event per individual, linked to multiple Citations and Sources.
If you prefer to record multiple Birth Events where different Sources give conflicting information, then tick Offer to create multiple births for individuals.
However, you should also tick …even if existing birth includes place and date on the Census settings page, to ensure the multiple births option is presented.
Then when the data is saved, the Birth Event Suggestions will include the option to Create an additional birth event with date and place suggested.
Other Options
Version 2.0 introduced the ability to create RepositoryA repository is a place (physical or online) where collections of original source data are stored and maintained. links, but this can be disabled by clearing the Allow repository use tick option.
The Use multi-line address option enables the multi-line edit button even for single line Addresses"The address structure should be formed as it would appear on a mailing label…", according to GEDCOM; however, this is capable of a number of interpretations, and Address and Place are best considered together., but is not recommended.
Clear the Associated Individuals – separate line in local notes option to list such Individuals on one line separated by commas.
The Same-sex relationships option relaxes the rule that partners, and fathers & mothers are of opposite gender.
(Same-sex relationships are not supported by Family Historian Version 3 or earlier).
Transcriber defines the name of the person entering data and is only relevant to the {SYSTEM.TRANSCRIBER} auto-text keyword.
Whole Person and Name Citations
Whole Person Citations
Whole person citations link the whole Individual RecordEvery person in your tree will have a single Individual Record, which holds all the information about that individual that you have entered. You can view and edit Individual records in the Property Box Dialogue. to an associated Source Record.
These citations may be created just for new individuals being added, or for all individuals involved in the data entry.
Name Field Citations
Name citations link just the Individual Name field to an associated Source Record.
These citations may be created just for new individuals and name changes being added, or for all individuals involved in the entry.
By default Ancestral Sources only creates Individual Name field citations for new individuals and name changes.
**Census Settings
Newcomers in particular are recommended to work with the default installation settings, until sufficient experience is gained to make an informed choice. However, you need to pay particular attention when choosing your source recording method (Method 1 for ‘source splitters’ and Method 2 for ‘source lumpers’ ) so please see Working with Sources and Citations for advice before continuing, if you have not already done so. Items marked ** need particular consideration, as you may not wish to work with the default settings.
Remember to use Help to obtain extra advice, and hover the mouse over buttons and boxes to obtain a brief Tooltip.
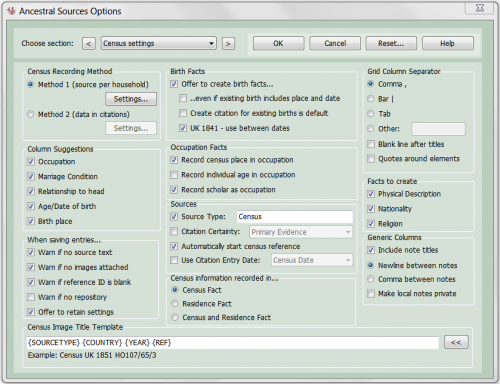
Use Tools > Options to open the Options window and ensure Census settings is selected.
**Census Recording Method
Method 1 creates a separate Source Record for each household Census return, with the Text From Source field containing its transcript, plus Multimedia links to any Census Form images, and optionally a Repository link to identify where the original is lodged. Then every Fact gleaned from this source cites the Source Record. So every Census, Birth, Occupation, Residence, and new Name for each person in the Census is linked to the one source via a Citation that often contains little information apart from an Entry Date and Assessment. This method will result in many sources, but each transcript and associated notesFamily Historian version 6 and below supports two types of Notes: Local notes (associated with a single person, record, or fact); and Note Records (sometimes called Shared Notes), that can be linked to multiple records and/or facts. Version 7 introduced and images are all recorded in one place, which makes corrections and updates easy to perform.
Method 2 usually has one Source Record for an entire Census year such as “Census UK 1851”, and every Fact gleaned from this Census year cites the Source Record. So every Census, Birth, Occupation, Residence, and new Name for each person in that Census year is linked to the same source via a Citation with an Entry Date and Assessment. The Citation may use its Text From Source field to hold a household Census transcript, but this results in duplicate copies of the same data for all the Facts gleaned from that household Census. Alternatively, the transcript may be placed in a linked Note record, which avoids the duplication. Multimedia links to any Census Form images may be attached either to each Citation or each Fact. This method will result in very few Source Records and is a better choice if transcriptions and image links are not usually required.
Column Suggestions
When you Populate the Census Grid on the main screen, there are several columns where Ancestral Sources can automatically enter an existing value derived from your GEDCOM data. For example, if a person has a Birth Event then the Date field can be used to calculate their Age.
The tick options in this section let you to choose the columns for which these suggested values may be entered. If necessary you may manually change these values to match the actual Census data.
When Saving Census Entries
It is all too easy to forget to complete all the details before you Save to Family Historian and these options let you choose which warnings you prefer.
There is also an Offer to retain settings option that allows data entered to be carried forward to a subsequent entry.
Birth Facts
When you Save to Family Historian, Ancestral Sources can offer Birth Event suggestions where better Place or Date details are available from the Census.
These suggestions are enabled by ticking the Offer to create birth facts… option, and can be further enabled …even if existing birth includes place and date.
In the UK 1841 Census ages over 15 were usually rounded down to the nearest multiple of 5, so between dates is a better suggestion for the Birth Date in such cases, and this option can be enabled here.
Occupation Facts
Ancestral Sources automatically creates an Occupation Fact for each person with an entry in the Occupation column of the Census.
The Address field is never filled in, because the Census address is unlikely to also be the work-place address, but the work-place is probably nearby, so the Record census place in occupation option allows the Census Place to be recorded as the Occupation Place too.
There is also the option to Record individual age in occupation, although this is not usually considered relevant to the Occupation Fact.
Children often have Scholar entered on the Census as their occupation, and the Record scholar as occupation option allows an Occupation Fact to be created in this case.
**Sources
The Source Type option allows the specified text, such as Census, to be entered in the Type field of the Source Record. If this field is altered, it is easy in Family Historian to use Tools > Work with Data > Source Types > Replace with and change all existing Source Records to match.
The Citation has an Assessment field with values such as Primary evidence and Secondary evidence, which can be automatically entered by selecting the Citation Certainty option. It is popular to tick this option and choose Primary evidence to indicate the official first-hand nature of a national Census.
The Citation also has an Entry Date field, and the Use Citation Entry Date option allows the Census Date to be automatically entered. It also allows Today’s Date to be entered, but is not the intended use in the GEDCOM standard.
Sometimes the start of the Census reference is known. For example, the UK 1851 Census always starts its reference with HO107. The Automatically start census reference option allows this value to be entered automatically in the Ref ID field on the main screen.
Census Information Record
Usually the Census information is recorded in a Census Fact, but some users prefer to use a Residence Fact, or even both Facts, and this can be selected here.
**Grid Column Seperator
The Census Grid columns can be automatically entered into the main screen Text field as a transcript of the Census. This section allows the column separator character(s) to be chosen. See the Edit Auto Text and Note tutorial for examples of using these options. The Other box allows {TAB} to be entered to represent a tab character.
There are pros and cons for each alternative, and the how to Tabulate Multiline Text in Records and Reports guide offers some workable solutions.
The Blank line after titles option allows a blank line to be inserted below the column headings.
The Quotes around elements option placesAccording to GEDCOM, a Place should hold "The jurisdictional name of the place where the event took place…" inverted commas (“) around the data in each cell to make it compatible with the popular spreadsheet Comma Separated Value (CSV) format. In particular it hides the commas often found in the Where Born column to specify Place information.
Facts to Create
Some Census Grids have columns that could be recorded in Physical Description, Nationality, or Religion facts, and these options enable or disable such facts being created.
Generic Columns
Some Census Grid columns have the option to record their data in the Census Fact or Occupation Fact local Note field.
The options in this section allow the column Titles to be included in the Note field, allow notes to be separated by Newline or Comma, and whether to enclose the notes in double square brackets ([[ ]]) to make them Private.
**Census Image Title Template
This field defines one of the Title options available when you use Add MultimediaWhen you add a picture, video, sound recording, document file etc into a Family Historian project, a Media record is created to represent that media item within the project; the Media record includes a link to the actual Media file. Image. It allows template keywords to be used, which are described in the tutorial Working With Templates.
It is advisable to choose a consistent naming convention for Multimedia that assists in locating records and images, both in the Multimedia Records window of Family Historian, and in the File Name details of Windows Explorer. The default settings are a good starting point and many users also add the Head of household {KEYPERSON.SN_GN.CAPS} after the {REF}.
Census Settings – Method 2
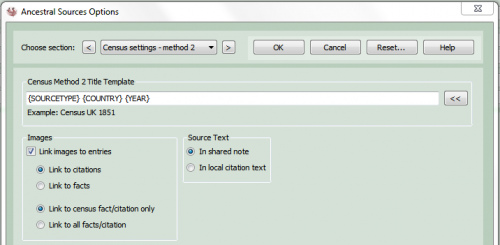 On the Census settings page, select Census Recording Method 2 (data in citations) and click the Settings button.
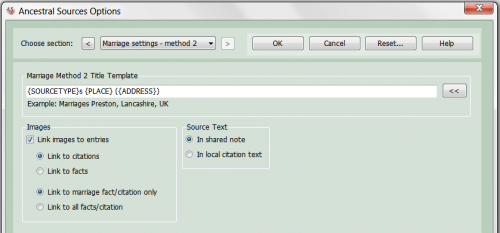
Census Method 2 Title Template
This field defines the Title to be used on the rare occasions when a new Source Record needs to be created. It allows template keywords to be used, which are described in the tutorial Working With Templates.
**Images
If the Link images to entries option is ticked, then you can choose either to link them to Citations or to Facts, and whether to link to the Census entry alone, or to all entries.
In Family Historian V3 both these links are only visible in the Individual Property Box via the All tab.
From Family Historian V4 onwards the Facts multimedia links are visible in the Individual Property Box on the Facts tab, so Link to facts may be a more convenient option.
If you plan to have many image links, then Method 1 may be a better choice.
**Source Text
You can choose to place the main screen Text Census transcript in either in a single linked Note record or in each Citation’s local Text From SourceBoth Source records and Citations have a Text From Source field intended to hold transcripts of source documents. field.
The linked Note record avoids duplicating the transcript, but is only visible in the Individual Property Box via the All tab, or by switching to the Note Records window.
The Citation local Text From Source field is very visible, but the transcript is duplicated in many Citation fields.
If you plan to have many transcripts, then Method 1 is a better choice.
Census Settings – Method 1
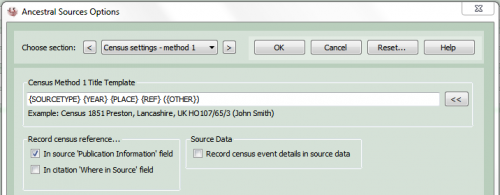 Return to the Census settings page, select Census Recording Method 1 (source per household) and click the Settings button.
**Census Method 1 Title Template
This field defines the Title to be applied in creating the Source Record. It allows template keywords to be used, which are described in the tutorial Working With Templates.
It is advisable to choose a consistent naming convention for Source RecordsSource: "where information was found". This could be anything from an archive in a county records office, a book, or even a relative's recorded recollection. Citing your Sources helps to show how you reached a particular conclusion about an Individual. that assists in locating them in the Source Records windowThe Records Window provides a comprehensive view of all the information stored within a Family Historian project. of Family Historian. The default settings are a good starting point, but many users prefer a template similar to the example in Method 2 above.
When you use Add Multimedia Image there are useful options in the Image Viewer that allow the Multimedia Record and the Image Filename to all use the Source Record Title defined here.
Record Census Reference
You can choose to place the main screen census Ref ID field in the source Publication Information field &/or the citation Where within Source field.
Source Data
This option enables an obscure GEDCOM feature that allows an event type, date, and place to be attached to the Source Record.
In Family Historian it is only visible in the Individual/Source Property Box via the All tab.
**Baptism Settings
Newcomers in particular are recommended to work with the default installation settings, until sufficient experience is gained to make an informed choice. Exceptions to this recommendation are marked with** and extra advice is given in this tutorial to help make a choice.
Remember to use Help to obtain extra advice, and hover the mouse over buttons and boxes to obtain a brief Tooltip.
Many of these settings are important, but especially the choice between Method 1 for ‘source splitters’ and Method 2 for ‘source lumpers’ , so please see Working with Sources and Citations for advice before continuing, if you have not already done so. Items marked ** need particular consideration, as you may not wish to work with the default settings.
Baptism Settings
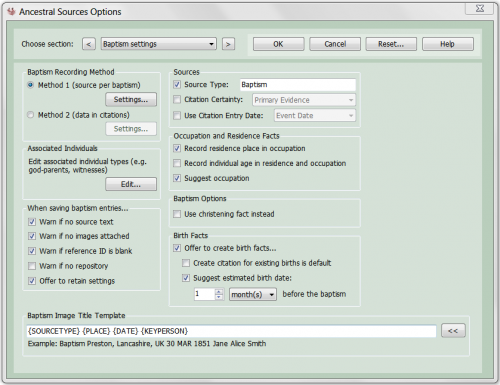 Use Tools > Options to open the Options window and ensure Baptism settings is selected.
**Baptism Recording Method
Method 1 creates a separate Source Record for each baptism or christening, with the Text From Source field containing its transcript, plus Multimedia links to any baptismal entry images, and optionally a Repository link to identify where the original is lodged. Then every Fact gleaned from this source cites the Source Record. So every Baptism, Birth, Occupation, Residence, and new Name for each person at the baptism is linked to the one source via a Citation that often contains little information apart from an Entry Date and Assessment. This method will result in many sources, but each transcript and associated notes and images are all recorded in one place, which makes corrections and updates easy to perform.
Method 2 usually has one Source Record for a baptismal location such as “Baptisms Preston, Lancashire, UK”, and every Fact gleaned from this location cites the Source Record. So every Baptism, Birth, Occupation, Residence, and new Name for each person at any baptism in that location is linked to the same source via a Citation with an Entry Date and Assessment. The Citation may use its Text From Source field to hold a baptismal transcript, but this results in duplicate copies of the same data for all the Facts gleaned from that baptism. Alternatively, the transcript may be placed in a linked Note record, which avoids the duplication. Multimedia links to any baptismal entry images may be attached either to each Citation or each Fact. This method will result in very few Source Records and is a better choice if transcriptions and image links are not usually required.
Associated Individuals
The Edit button opens the Associated Individuals Type window that specifies how individuals, such as god-parents and witnessesA Witness is somebody who played an important role in an event (or rarely, attribute) but were not a Principal, e.g. they could have been a bridesmaid at a wedding, rather than one of the individuals getting married., are recorded. This employs various options and template keywords, which are described in the tutorial Working With Templates.
When Saving Baptism Entries
It is all too easy to forget to complete all the details before you Save to Family Historian and these options let you choose which warnings you prefer.
There is also an Offer to retain settings option that allows data entered to be carried forward to a subsequent entry.
**Sources
The Source Type option allows the specified text, such as Baptism, to be entered in the Type field of the Source Record. If this field is altered, it is easy in Family Historian to use Tools > Work with Data > Source Types > Replace with and change all existing Source Records to match.
The Citation has an Assessment field with values such as Primary evidence and Secondary evidence, which can be automatically entered by selecting the Citation Certainty option. It is popular to tick this option and choose Primary evidence to indicate the official first-hand nature of a baptismal entry.
The Citation also has an Entry Date field, and the Use Citation Entry Date option allows the Event Date to be automatically entered. It also allows Today’s Date to be entered, but is not the intended use in the GEDCOM standard.
Occupation and Residence Facts
Ancestral Sources automatically creates an Occupation Fact for either parent with an entry in their Occupation field.
The Address field is never filled in, because the Residence Address is unlikely to also be the work-place address, but the work-place is probably nearby, so the Record residence place in occupation option allows the Residence Place to be recorded as the Occupation Place too.
There is also the option to Record individual age in residence and occupation, although this is not usually considered relevant to the Residence Fact or Occupation Fact.
If Suggest occupation is ticked then Ancestral Sources will attempt to suggest an Occupation for either parent gleaned from your GEDCOM data.
Baptism Options
The Use christening fact instead option instructs Ancestral Sources to create a Christening fact instead of a Baptism fact. It also changes the value of the {SOURCETYPE} template keyword from Baptism to Christening.
Birth Facts
By default Ancestral Sources will offer to create Birth Facts for Individuals.
There is an option to cite the Baptism Source for existing Birth Facts.
Baptisms usually take place shortly after a birth, so the Suggest estimated birth date option allows you to choose this time lapse. This is used to suggest a birth date when you Save to Family Historian and the Birth Events from Entry window is presented.
**Baptism Image Title Template
This field defines one of the Title options available when you use Add Multimedia Image . It allows template keywords to be used, which are described in the tutorial Working With Templates.
It is advisable to choose a consistent naming convention for Multimedia that assists in locating records and images, both in the Multimedia Records window of Family Historian, and in the File Name details of Windows Explorer. The default settings are one approach, but some users prefer something similar to {KEYPERSON.SN_GN.CAPS} {DATE} {SOURCETYPE}, which sorts records into a similar order to the Individual Records window in Family Historian.
Baptism Settings – Method 2
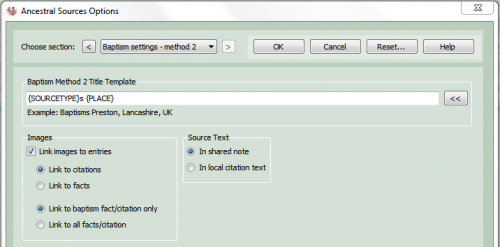 On the Baptism settings page, select Baptism Recording Method 2 (data in citations) and click the Settings button.
Baptism Method 2 Title Template
This field defines the Title to be used on the rare occasions when a new Source Record needs to be created. It allows template keywords to be used, which are described in the tutorial Working With Templates.
**Images
If the Link images to entries option is ticked, then you can choose either to link them to Citations or to Facts, and whether to link to the Baptism entry alone, or to all entries.
In Family Historian V3 both these links are only visible in the Individual Property Box via the All tab.
From Family Historian V4 onwards the Facts multimedia links are visible in the Individual Property Box on the Facts tab, so Link to facts may be a more convenient option.
If you plan to have many image links, then Method 1 may be a better choice.
**Source Text
You can choose to place the main screen Text Baptism transcript in either in a single linked Note record, or in each Citation’s local Text From Source field.
The linked Note record avoids duplicating the transcript, but is only visible in the Individual Property Box via the All tab, or by switching to the Note Records window.
The Citation local Text From Source field is very visible, but the transcript is duplicated in many Citation fields.
If you plan to have many transcripts, then Method 1 is a better choice.
Baptism Settings – Method 1
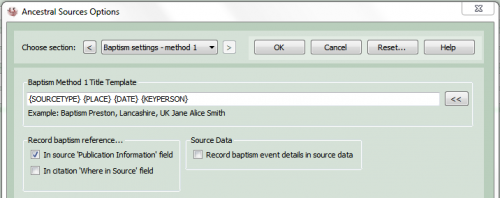 Return to the Baptism settings page, select Baptism Recording Method 1 (source per baptism) and click the Settings button.
**Baptism Method 1 Title Template
This field defines the Title to be applied in creating the Source Record. It allows template keywords to be used, which are described in the tutorial Working With Templates.
It is advisable to choose a consistent naming convention for Source Records that assists in locating them in the Source Records window of Family Historian. The default settings are one approach, but some users prefer a template similar to the Baptism Image Title Template in Method 2 above..
When you use Add Multimedia Image there are useful options in the Image Viewer that allow the Multimedia Record and the Image Filename to all use the Source Record Title defined here.
Record Baptism Reference
You can choose to place the main screen Further Info tab Ref ID field in the source Publication Information field &/or the citation Where within Source field.
Source Data
This option enables an obscure GEDCOM feature that allows an event type, date, and place to be attached to the Source Record.
In Family Historian it is only visible in the Individual/Source Property Box via the All tab.
**Marriage Settings
Newcomers in particular are recommended to work with the default installation settings, until sufficient experience is gained to make an informed choice. Exceptions to this recommendation are marked with** and extra advice is given in this tutorial to help make a choice.
Remember to use Help to obtain extra advice, and hover the mouse over buttons and boxes to obtain a brief Tooltip.
Many of these settings are important, but especially the choice between Method 1 for ‘source splitters’ and Method 2 for ‘source lumpers’ , so please see Working with Sources and Citations for advice before continuing, if you have not already done so. Items marked ** need particular consideration, as you may not wish to work with the default settings.
Marriage Settings
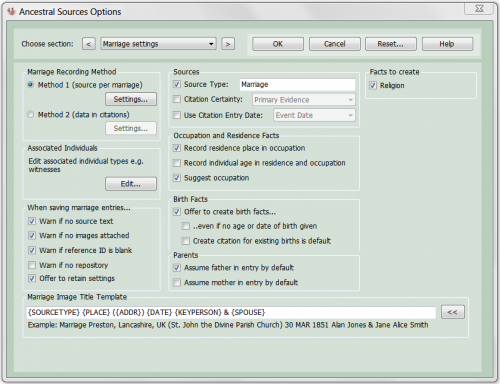 Use Tools > Options to open the Options window and ensure Marriage settings is selected.
**Marriage Recording Method
Method 1 creates a separate Source Record for each marriage, with the Text From Source field containing its transcript, plus Multimedia links to any marriage record images, and optionally a Repository link to identify where the original is lodged. Then every Fact gleaned from this source cites the Source Record. So every Marriage, Birth, Occupation, Residence, and new Name for each person at the marriage is linked to the one source via a Citation that often contains little information apart from an Entry Date and Assessment. This method will result in many sources, but each transcript and associated notes and images are all recorded in one place, which makes corrections and updates easy to perform.
Method 2 usually has one Source Record for a marriage location such as “Marriages Preston, Lancashire, UK”, and every Fact gleaned from this location cites the Source Record. So every Marriage, Birth, Occupation, Residence, and new Name for each person at any marriage in that location is linked to the same source via a Citation with an Entry Date and Assessment. The Citation may use its Text From Source field to hold a marriage transcript, but this results in duplicate copies of the same data for all the Facts gleaned from that marriage. Alternatively, the transcript may be placed in a linked Note record, which avoids the duplication. Multimedia links to any marriage record images may be attached either to each Citation or each Fact. This method will result in very few Source Records and is a better choice if transcriptions and image links are not usually required.
Associated Individuals
The Edit button opens the Associated Individuals Type window that specifies how individuals, such as witnesses, bridesmaids, and best man, are recorded. This employs various options and template keywords, which are described in the tutorial Working With Templates.
When Saving Marriage Entries
It is all too easy to forget to complete all the details before you Save to Family Historian and these options let you choose which warnings you prefer.
There is also an Offer to retain settings option that allows data entered to be carried forward to a subsequent entry.
**Sources
The Source Type option allows the specified text, such as Marriage, to be entered in the Type field of the Source Record. If this field is altered, it is easy in Family Historian to use Tools > Work with Data > Source Types > Replace with and change all existing Source Records to match.
The Citation has an Assessment field with values such as Primary evidence and Secondary evidence, which can be automatically entered by selecting the Citation Certainty option. It is popular to tick this option and choose Primary evidence to indicate the official first-hand nature of a Marriage record.
The Citation also has an Entry Date field, and the Use Citation Entry Date option allows the Event Date to be automatically entered. It also allows Today’s Date to be entered, but is not the intended use in the GEDCOM standard.
Occupation and Residence Facts
Ancestral Sources automatically creates an Occupation Fact for either spouse or their parents with an entry in their Occupation field.
The Address field is never filled in, because the Residence Address is unlikely to also be the work-place address, but the work-place is probably nearby, so the Record residence place in occupation option allows the Residence Place to be recorded as the Occupation Place too.
There is also the option to Record individual age in residence and occupation, although this is not usually considered relevant to the Residence Fact or Occupation Fact.
If Suggest occupation is ticked then Ancestral Sources will attempt to suggest an Occupation for either spouse or their parents gleaned from your GEDCOM data.
Birth Facts
By default Ancestral Sources will offer to create Birth Facts for Individuals, with the additional option of even if no age or date of birth given.
There is an option to cite the Marriage Source for existing Birth Facts.
Parents
A marriage certificateMarriage Certificates are a civil record of the marriage of spouses, and typically include the date and place of marriage together with information about parents, witnesses and ministers or registrars involved in the service. often only refers to the fathers of the married couple. The options allow either parent to be included or excluded from the auto-text transcript by default.
Facts to Create
If the ReligionThe GEDCOM specification says that the Religion attribute should be used for the religious denomination to which a person is affiliated or for which a record applies. option is ticked, and a religion is entered for either spouse, the a Religion Fact will be created for them.
**Marriage Image Title Template
This field defines one of the Title options available when you use Add Multimedia Image. It allows template keywords to be used, which are described in the tutorial Working With Templates.
It is advisable to choose a consistent naming convention for Multimedia that assists in locating records and images, both in the Multimedia Records window of Family Historian, and in the File Name details of Windows Explorer. The default settings are one approach, but some users prefer something similar to {KEYPERSON.SN_GN.CAPS} & {SPOUSE.SN_GN.CAPS} {DATE} {SOURCETYPE}, which sorts records into a similar order to the Individual Records and Family Records windows in Family Historian.
Marriage Settings – Method 2
 On the Marriage settings page, select Marriage Recording Method 2 (data in citations) and click the Settings button.
Marriage Method 2 Title Template
This field defines the Title to be used on the rare occasions when a new Source Record needs to be created. It allows template keywords to be used, which are described in the tutorial Working With Templates.
**Images
If the Link images to entries option is ticked, then you can choose either to link them to Citations or to Facts, and whether to link to the Marriage entry alone, or to all entries.
From Family Historian V4 onwards the Facts multimedia links are visible in the Individual Property Box on the Facts tab, so Link to facts may be a more convenient option.
If you plan to have many image links, then Method 1 may be a better choice.
**Source Text
You can choose to place the main screen Text Marriage transcript in either in a single linked Note record or in each Citation’s local Text From Source field.
The linked Note record avoids duplicating the transcript, but is only visible in the Individual Property Box via the All tab, or by switching to the Note Records window.
The Citation local Text From Source field is very visible, but the transcript is duplicated in many Citation fields.
If you plan to have many transcripts, then Method 1 is a better choice.
Marriage Settings – Method 1
 Return to the Marriage settings page, select Marriage Recording Method 1 (source per Marriage) and click the Settings button.
**Marriage Method 1 Title Template
This field defines the Title to be applied in creating the Source Record. It allows template keywords to be used, which are described in the tutorial Working With Templates.
It is advisable to choose a consistent naming convention for Source Records that assists in locating them in the Source Records window of Family Historian. The default settings are one approach, but some users prefer a template similar to the Marriage Image Title Template above.
When you use Add Multimedia Image there are useful options in the Image Viewer that allow the Multimedia Record and the Image Filename to all use the Source Record Title defined here.
Record Marriage Reference
You can choose to place the main screen Further Info tab Ref ID field in the source Publication Information field &/or the citation Where within Source field.
Source Data
This option enables an obscure GEDCOM feature that allows an event type, date, and place to be attached to the Source Record.
In Family Historian it is only visible in the Individual/Source Property Box via the All tab.
Customise ~ Colour and Font
These options allow the Colour Scheme and Font of the user interface to be customised.
The installation defaults are Olive and Tahoma, Regular, Size 8 respectively.
Remember hover the mouse over buttons and boxes to obtain a brief Tooltip.
Customise
Use Tools > Customise to open the Customise options window.
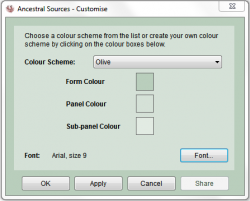
 Select a Colour Scheme from the drop-down list, and click Apply to see what it looks like.
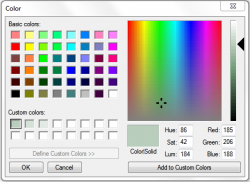
Click on each Colour box in turn and choose a Custom colour, then click Apply to visualise the scheme. This colour combination is given the name Custom in the Colour Scheme list and is saved once the OK button is clicked. However, if one of the four preset schemes is chosen and OK clicked, the Custom scheme is deleted.
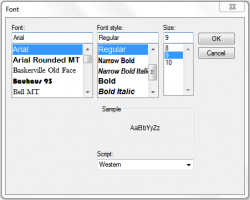 Click the Font button, select a Font face, style & size such as Arial, Regular & 9, then click OK, and finally click Apply to invoke the font.
When satisfied with the Colour Scheme and Font click OK. Alternatively, click Cancel to restore the original settings.
Backup and Restore AS Options
 All the Tools > Options and Customise settings are stored in the Windows Registry.
You can Backup these settings to a file and then Restore them later.
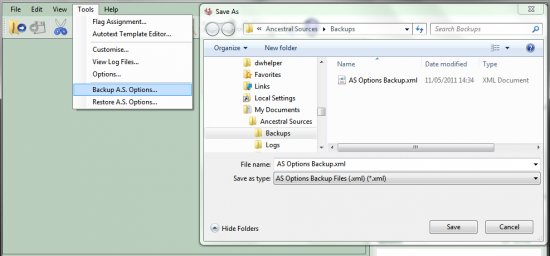
Backup A.S. Options
Use Tools > Backup A.S. Options to save the settings to a file.
Restore A.S. Options
Use Tools > Restore A.S. Options to restore the settings from a file.
When you’ve finished the tutorial, remember to Restore Original Settings.